🚀 v2.12
Already using SmartGallery for ComfyUI? Your gallery just became a full DAM.See what changed →
🔍
Start typing to search the wiki…
You generate hundreds of images a day. Finding them again, and sharing them professionally, is harder than it should be.
🐍 Python · HTML🐳 Docker📱 Mobile100% Free
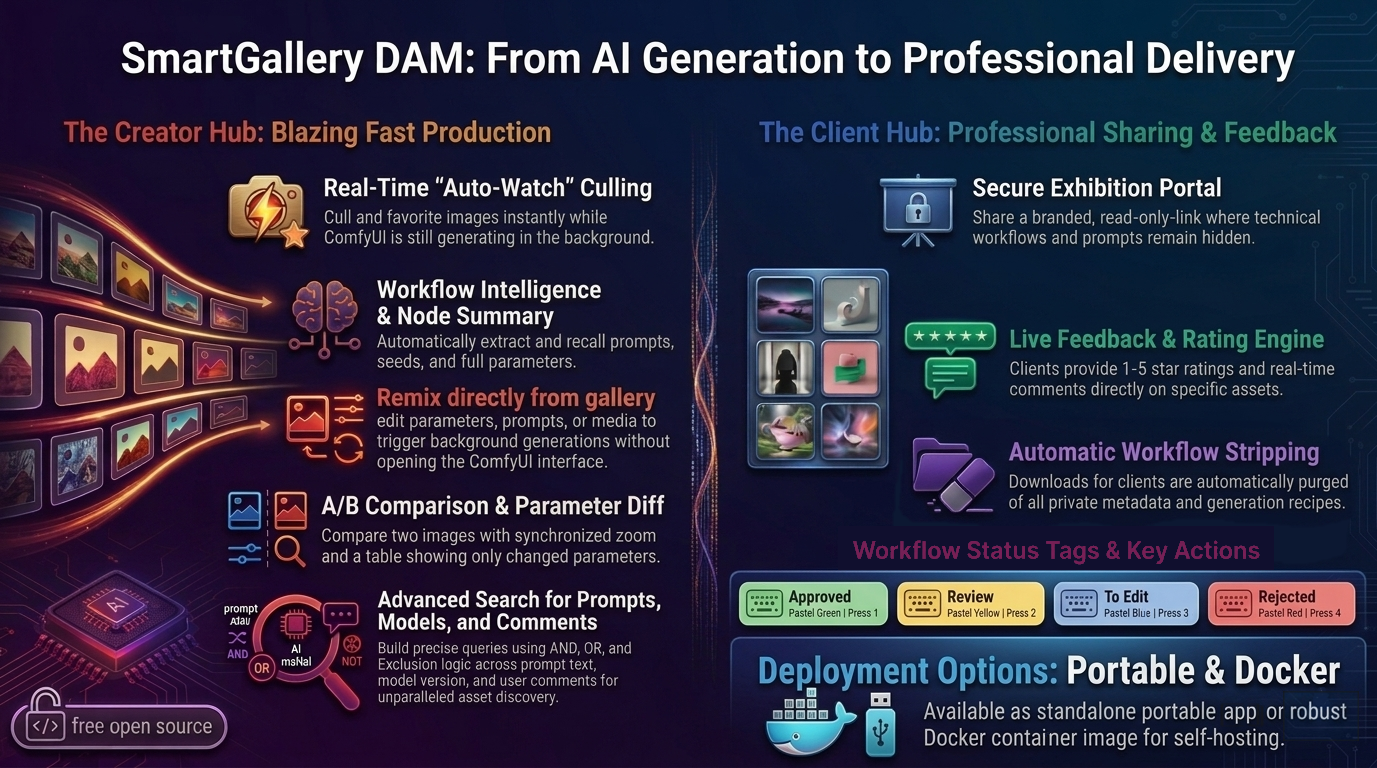
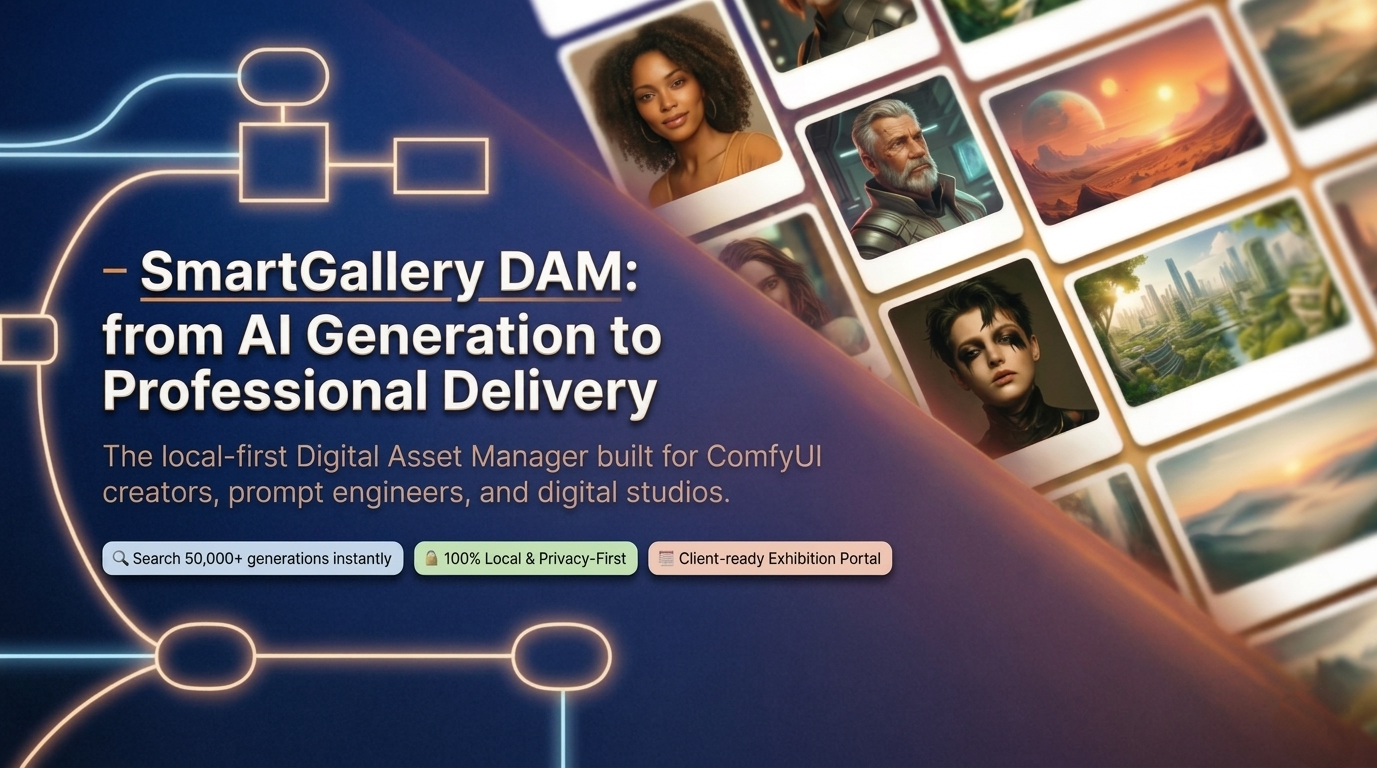
Bring Order to Chaos. Your Local ComfyUI Asset Manager
SmartGallery DAM: bridging your creative workflow to professional client approval. 100% Local. Zero subscriptions.
Evolve your ComfyUI workflow from a simple collection of files into a structured, searchable Digital Asset Management system. Designed for individual creators and professional teams, this platform is ridiculously simple to use, yet powerful enough to act as the ultimate file manager for your generations. Every asset is automatically indexed, linked to its original generative parameters, and ready for secure review. The system is open-source, private, and entirely local: no cloud dependencies and no recurring costs.
If you already use SmartGallery v1 as an advanced file manager, v2 takes you further: structured collections, team roles, a dedicated client portal, and tools to present your work to an audience. Everything you know still works. It runs 100% on your machine, needs no cloud, and works with ComfyUI outputs, video files, photography archives, or any media folder you point it at.
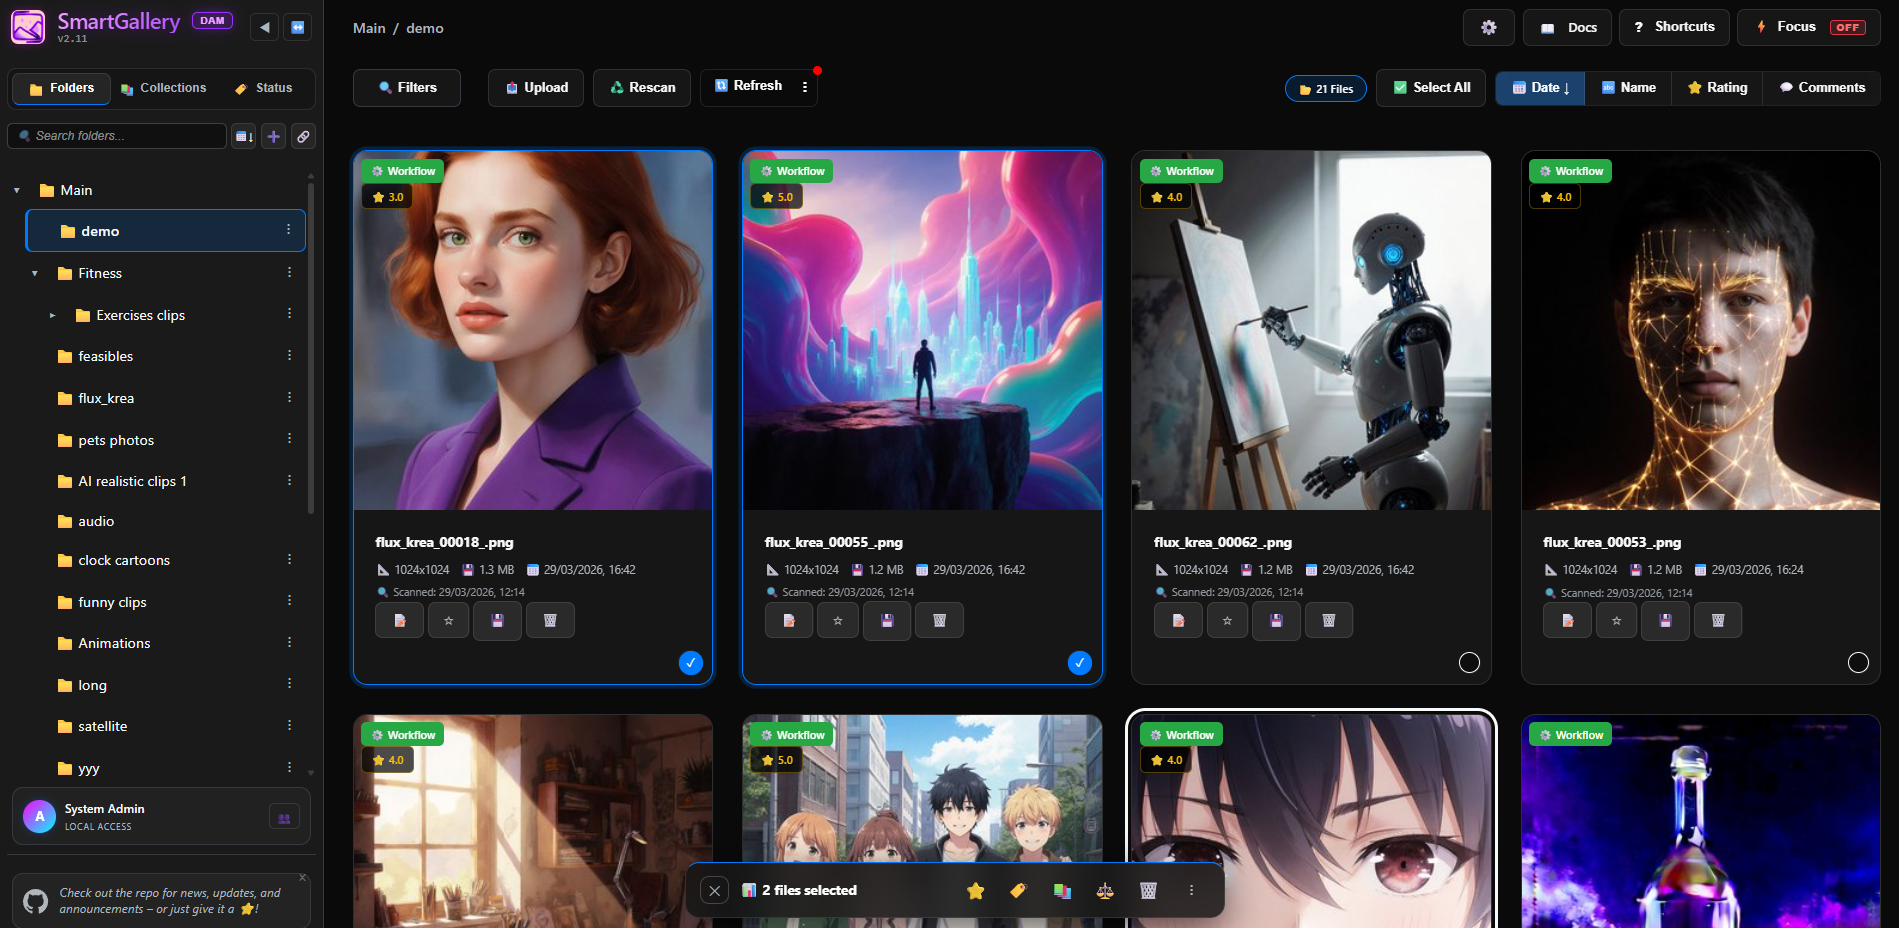
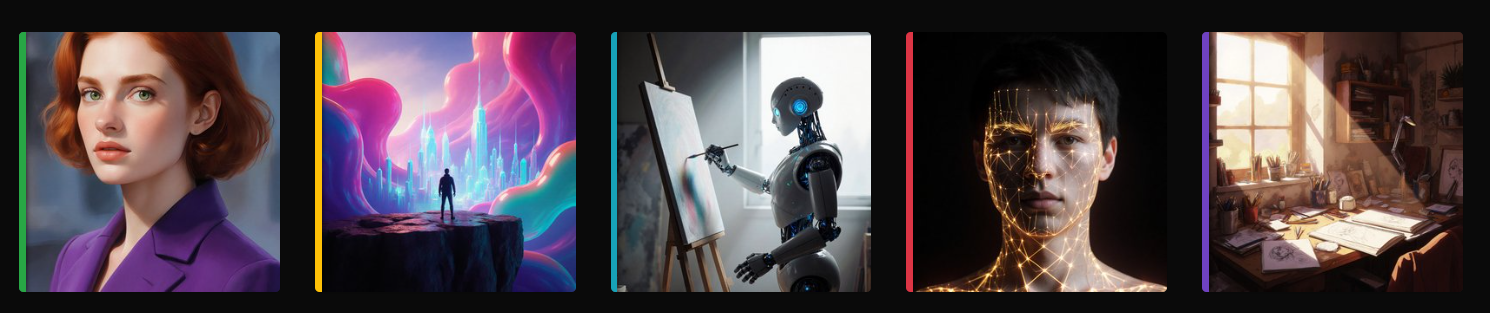
The main interface: your full workspace for organizing, tagging, and searching every generation.
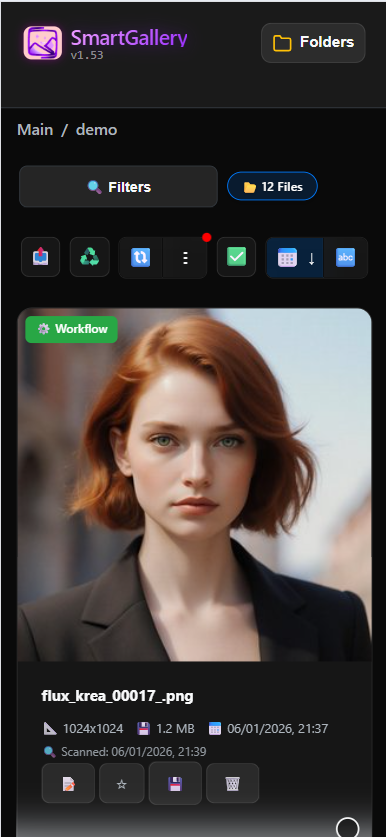
Mobile main interface
Browse and cull on your phone
Who is SmartGallery DAM for?
You generate a lot. You deserve better tools.
No paid subscriptions, no cloud uploads, no vendor lock-in. Pick your scenario.
🎨
The AI Artist
"I run ComfyUI all day. My output folder has 40,000 files. I can never find anything."
› Auto-Watch culls images while ComfyUI generates
› Search by prompt, model, LoRA or seed. Instantly.
› Node summary recalls exactly how any image was made
› Compare two generations with a parameter diff table
› Browse and cull from your phone while away from desk
› Rate your own images and leave notes to your future self directly from the main interface
›Full web file manager: delete bad generations, move keepers to other folders or drives, rename, reorganize: all from the browser. Think Windows Explorer, but faster and without leaving your workflow.
🤝
The Creative Pro / Team
"I deliver AI visuals to clients. Sharing via Google Drive or Dropbox feels unprofessional."
› Send clients a branded, secure Exhibition link
› They rate images 1–5 stars and leave feedback in real time
› Clients see the images, never your prompts or workflows.
› Color-coded team review tags: Approved, Review, Rejected
› Multi-user ACL: MANAGER, STAFF, CUSTOMER and GUEST roles out of the box
🏠
Everyone Else
"I want a proper way to organize my AI generations, holiday photos and videos. And maybe share some of it with family or friends."
› Works with any folder: AI generations, photos, videos, art, archives
› No ComfyUI required. Install and point at any directory.
› Tag, rate, and organize everything into virtual collections, no need to move files around
› Optionally share a collection with family or friends via Exhibition: they can browse, comment and rate
› Your data never leaves your machine. No Google, no iCloud.
› Docker-ready: runs on a NAS or home server 24/7
Video presentation
Understand the big picture
A SmartGallery DAM Presentation: what it is, why it exists, and how the two interfaces fit together.
▶
SmartGallery DAM — Presentation
5:30 min · Click to play
✦ For existing SmartGallery users upgrading from v1.x to v2.x
Your gallery just grew up.
If you've been using SmartGallery to browse your ComfyUI outputs, you already know the core experience.
Everything you rely on in v1.x is still there: the fast grid, workflow extraction, node summary, Auto-Watch, keyboard shortcuts, Compare Mode, mobile browsing. Not a line of that was removed.
What v2 adds on top is a complete professional layer: a team-ready main interface (what you already use), plus a brand-new Exhibition portal you can share with clients, collaborators, friends, or family. Think of it as your gallery finally having a front door you can hand out a key to, without handing out your entire workflow archive.
The version number jumped from 1.x to 2.x because this is a new paradigm, not just a feature drop. The architecture, ACL system, and multi-user logic required a ground-up rethink. But your existing setup, your existing folders, your existing data are all forward-compatible.
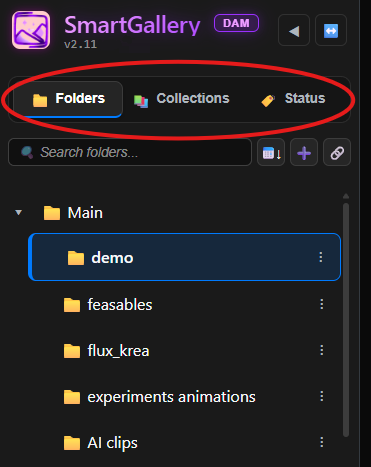
The sidebar you know from v1.x had one tab: the folder tree. In v2 it has three. The familiar Folders tab is still there. Next to it you now have a Status tab that lets you browse all files in a given review state (all Approved images, all Rejected, all flagged for Review) across every folder at once. And a Collections tab where you navigate your virtual collections, both private ones for your own organization and Exhibition-ready ones that will appear in Exhibition for your clients.
📂 Sidebar: Folders, Status and Collections tabs
The left sidebar now has three tabs. Folders is the familiar directory tree. Status lets you browse all files with a given review state across every folder at once. Collections shows your virtual albums.
Group files from different physical folders into named albums without moving anything on disk. Mark a collection as Exhibition Ready to make it visible in the sharing portal. Private collections are invisible to guests.
⭐ 1–5 Star rating system per image
Rate any image from 1 to 5 stars. Works for solo users too: a great way to personally curate your own library and surface your best work. Ratings are per-user, a global average is shown instantly, and you can sort the grid by highest rated.
💬 Real-time Comments
Leave notes on any image, whether you work alone or with a team. Solo users can annotate their own files as personal memos. With a team, each message has its own visibility: Public, Internal (staff only), or Direct Message to a specific user. Comment keywords are searchable from the Filters panel. Press G on any image to open the details panel.
🏷️ Color-coded team status tags
Tag any image with a pipeline state using keys 1 to 5: Approved (green), Rejected (red), Review (yellow), Select (purple), To Edit (blue). Browse all files with a given status from the Status tab in the sidebar.
👥 Full user management + roles (ACL)
Create accounts and assign roles: Admin, MANAGER, STAFF, FRIEND, USER, CUSTOMER, GUEST. Each role controls which interface they can access, what they can see, and what they can download.
🎭 Exhibition Mode: optional sharing portal
A separate, read-only portal you can launch when you want to share your work with clients, collaborators, or friends. Completely optional: if you have no need to share, simply never launch it. Only the collections you mark as Exhibition Ready are visible. Workflows and prompts are always hidden.
🛡️ Automatic workflow stripping for guests
When a CUSTOMER or GUEST downloads an image from Exhibition, all embedded ComfyUI workflow data and EXIF metadata are automatically removed. Your prompts, models, and LoRAs stay private.
💽 Mount any external drive/folder
Link any external hard drive, NAS volume, or network path directly from the UI via symlinks. The folder appears in your sidebar alongside your regular folders. All DAM features work on the mounted content.
🔀 Dual-instance: Main Interface and Exhibition, independent
Run the main workspace and the Exhibition portal on different ports, together or independently, whenever you need them. They share the same database: files, tags, collections, and comments are always in sync.
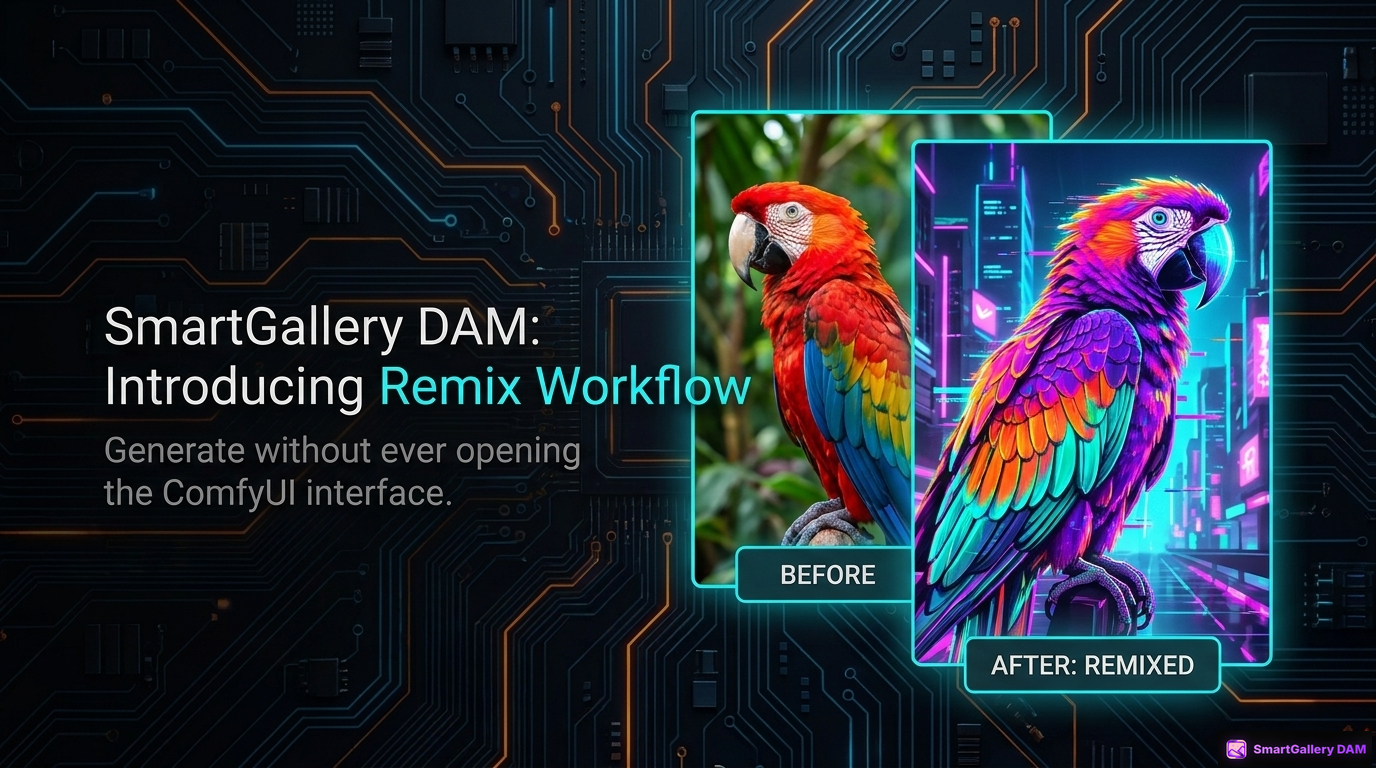
✦ The Remix Engine
Press B to access the 3-tier Remix workspace: Auto-Form, My Panel, and the raw JSON Nodepad. Generate directly from the gallery.
🌐 Not limited to ComfyUI only
Point SmartGallery at any folder on your system: photography archives, video collections, design projects, family albums. Workflow extraction only applies to ComfyUI files, but all other DAM features work on everything.
SmartGallery runs as a standalone process independent of ComfyUI. Since it's not a custom node, it remains fully functional even if your ComfyUI environment breaks after an update (and it will). SmartGallery keeps running, keeps indexing, keeps organizing. No crashes, no data loss, no problems.
It is ComfyUI-aware but not ComfyUI-dependent. It reads workflows, extracts prompts, understands models and LoRAs. But it does not need ComfyUI to be installed, running, or even present on the same machine. Install SmartGallery on a laptop, point it at your ComfyUI output folder over the network or a NAS, and browse your full library from any browser, including your phone.
Point it at any folder on your system: a photography archive, a design project, a video collection, a family album. Tagging, Collections, ratings, comments, search, Compare Mode, Exhibition sharing and file operations all work on everything. SmartGallery outlives every tool it connects to. Mount any external drive or network path via the Symlink tool and it appears in your sidebar like any other folder.
👨👩👧
Exhibition isn't just for clients.
Working solo? No clients? Exhibition Mode is still yours to use. Run it as a private family photo portal, a portfolio to show friends, or a clean showcase of your generative art, without the technical clutter of the main interface.
Mark a Collection as "Exhibition Ready", spin up Exhibition on port 8190, share the link. Your parents can browse holiday photos. Your friend can rate your latest AI series. You get their feedback structured and searchable. All without sending a single ZIP file.
Why SmartGallery?
Everything your AI workflow actually needs
Built by a digital artist, for digital artists. Works with ComfyUI, or with any media library.
⚡
Real-Time Culling While ComfyUI Generates
Don't wait for the batch to finish. SmartGallery's Auto-Watch mode makes new files appear the instant ComfyUI saves them. Press Del to trash bad seeds immediately, F to favorite the keepers, M to move them. All while generation is still running. Your scroll position is never disturbed.
💬
Live Chat & Rating Engine
Every image becomes a collaboration hub. Staff and clients post 1-to-5 star ratings and real-time comments on specific assets. Search your entire gallery by keywords inside the feedback. Sort by "Highest Rated". Each message carries its own visibility: Public (everyone), Internal (staff only), or a Direct Message to a specific user, all within the same session.
📤
Magic Upload
Drag & drop or upload files from your PC or smartphone directly into any folder. ComfyUI workflows are automatically extracted and indexed on the fly.
🔗
Mount Any Drive, Instantly
Link external hard drives, NAS volumes, or any network path directly from the UI via Symlinks. They appear in your sidebar alongside your ComfyUI folders.
📱
True Mobile-First Design
Unlike ComfyUI itself, SmartGallery is meticulously crafted for mobile. Review generations, tag favorites, and reply to client comments perfectly from your smartphone, even when you're away from your desk.
🤝
Stop Sending Messy ZIP Files
Send your clients a secure, professional Exhibition link instead. They log in, browse only the collections you've marked as Exhibition Ready, leave star ratings and comments. You get structured feedback in real-time. No Google Drive, no Discord threads, no chaos.
🛡️
Your Prompts Stay Private
Share your art, keep your secrets. Exhibition Mode automatically strips all EXIF data and ComfyUI workflows before clients ever see the image. Use Shift+W in the main interface for a manual clean export anytime.
🚀
Blazing Fast
Lazy-loading, SQLite WAL caching, and parallel background workers. Handles tens of thousands of images without a stutter. First scan indexes everything; subsequent runs are instant.
⚖️
Parameter Diff Engine
Select any two generations and get an interactive A/B slider with synchronized zoom/pan, plus a table showing only the nodes that changed: Seed, CFG, LoRA weights, anything.
✦
The Remix Engine
Generate without opening ComfyUI. Break out of the canvas with a 3-tier workspace: tweak simple prompts in Auto-Form, build a custom dashboard in My Panel, or edit raw backend JSON safely with the revolutionary { } Nodepad.
🎬
Video & Waveforms
Auto-transcodes ProRes, MKV, AVI, MOV on-the-fly. Press E for a storyboard overview, or view dynamic audio waveforms with a real-time amplitude slider.
⚙️ Architecture & Tech Stack
🐍Python 3.9+ Backend
⚗️Flask + Waitress (Production WSGI)
🗃️SQLite with WAL Mode
🎬FFmpeg Video Processing
🐳Docker + Unraid CA
🌐HTML5/JS Frontend
🔒Zero Cloud Dependencies
🔄WAL Multi-User Concurrency
Two Interfaces, One System
From Main Interface to Client Portal
v2 ships two purpose-built interfaces that can run simultaneously on different ports. The main interface is what you already know from v1.x. Exhibition is what's new.
Main Interface (index.html) · The one you already use
Your Familiar Workspace, Now Evolved
For: Digital Artists, Prompt Engineers, Internal Teams
Full access to physical folders and virtual collections
Deep metadata extraction and node summary dashboard
Color-coded team status tags (Approved, Review, Rejected…)
Downloads include original files with embedded workflows
Full keyboard-driven workflow. All v1.x shortcuts still work.
Exhibition Interface (exhibition.html) · Brand new in v2
The Secure Sharing Portal
For: Clients, Art Directors, Friends, Family, General Public
Read-only view of assigned or public collections only
All workflows and prompts completely hidden from guests
Downloads automatically stripped of all metadata
Interactive 1–5 star rating system per image
Blind Rating Mode available to prevent group bias
Real-time comment and feedback system
Optional guest login, no account required
Per-message visibility: Public, Internal or Direct Message
Professional, distraction-free presentation layer
Quick Start
Install in minutes
Choose your platform. No heavy database servers required. SmartGallery self-initializes everything.
Requirements: Python 3.9+ · FFmpeg/FFprobe (recommended for video) · Works on Windows, macOS, Linux. Does not require ComfyUI to be running.
🪟 Windows
🍎 macOS
🐧 Linux
🐳 Docker
Option 1: Portable Version (Recommended)
Includes a fully self-contained Python 3.12 environment. No installation required.
1. Download the ZIP from GitHub Releases:
   https://github.com/biagiomaf/smart-comfyui-gallery/releases/latest
2. Extract the archive to any folder.
3. Edit 'run_smartgallery.bat' to set your ComfyUI paths.
4. Double-click 'run_smartgallery.bat' to start.

To Update: Download the new ZIP, extract, and copy your old
run_smartgallery.bat into the new folder to keep your settings.
@echo off
cd /d %~dp0
call venv\Scripts\activate.bat

:: --- CONFIGURATION: replace with your real paths ---
:: Use forward slashes (/) even on Windows
set "BASE_OUTPUT_PATH=C:/Path/To/ComfyUI/output"
set "BASE_INPUT_PATH=C:/Path/To/ComfyUI/input"
set "BASE_SMARTGALLERY_PATH=C:/Path/To/ComfyUI/output"
set "FFPROBE_MANUAL_PATH=C:/Path/To/ffmpeg/bin/ffprobe.exe"
set SERVER_PORT=8189

:: --- OPTIONAL LAUNCH PARAMETERS ---
:: Add any of the following to the python command below depending on your scenario:
::
::   --admin-pass yourpassword   Set the admin password (log in as: admin / yourpassword)
::   --force-login               Require login on the Main Interface (use with --admin-pass)
::   --exhibition                Start in Exhibition Mode instead of the Main Interface
::   --port 8190                 Use a different port (default: 8189)
::   --enable-guest-login        Allow anonymous guest access in Exhibition
::   --blind-rating              Hide global averages to prevent user bias
::
:: Example – Main Interface with login enforced:
::   python smartgallery.py --port 8189 --admin-pass yourpassword --force-login
::
:: Example – Exhibition on port 8190 with Blind Rating:
::   python smartgallery.py --exhibition --port 8190 --admin-pass yourpassword --blind-rating

:: --- START ---
python smartgallery.py
pause
⚠️ Use forward slashes on Windows
Always use / in paths, even on Windows. e.g. C:/ComfyUI/output not C:\ComfyUI\output
Update (Git)
cd smart-comfyui-gallery
git pull
venv\Scripts\activate
pip install -r requirements.txt
#!/bin/bash
source venv/bin/activate

# Fix for "Too many open files" on macOS
ulimit -n 4096

# --- CONFIGURATION: replace with your real paths ---
export BASE_OUTPUT_PATH="$HOME/ComfyUI/output"
export BASE_INPUT_PATH="$HOME/ComfyUI/input"
export BASE_SMARTGALLERY_PATH="$HOME/ComfyUI/output"
export FFPROBE_MANUAL_PATH="/opt/homebrew/bin/ffprobe"
export SERVER_PORT=8189

# --- OPTIONAL LAUNCH PARAMETERS ---
# Add any of the following to the python command below as needed:
#   --admin-pass yourpassword   set the admin password (username will be: admin)
#   --force-login               require login even on local network
#   --exhibition                start in Exhibition Mode instead of Main Interface
#   --port 8190                 use a different port (e.g. for a second Exhibition instance)
#   --enable-guest-login        allow anonymous access in Exhibition
#   --blind-rating              Hide global averages to prevent user bias
#
# Example – Main Interface with login enforced:
#   python smartgallery.py --port 8189 --admin-pass yourpassword --force-login
#
# Example – Exhibition on port 8190 with Blind Rating:
#   python smartgallery.py --exhibition --port 8190 --admin-pass yourpassword --blind-rating

# --- START ---
python smartgallery.py
Make it executable: chmod +x run_smartgallery.sh then run: ./run_smartgallery.sh
#!/bin/bash
source venv/bin/activate

# --- CONFIGURATION: replace with your real paths ---
export BASE_OUTPUT_PATH="$HOME/ComfyUI/output"
export BASE_INPUT_PATH="$HOME/ComfyUI/input"
export BASE_SMARTGALLERY_PATH="$HOME/ComfyUI/output"
export FFPROBE_MANUAL_PATH="/usr/bin/ffprobe"
export SERVER_PORT=8189

# --- OPTIONAL LAUNCH PARAMETERS ---
# Add any of the following to the python command below as needed:
#   --admin-pass yourpassword   set the admin password (username will be: admin)
#   --force-login               require login even on local network
#   --exhibition                start in Exhibition Mode instead of Main Interface
#   --port 8190                 use a different port (e.g. for a second Exhibition instance)
#   --enable-guest-login        allow anonymous access in Exhibition
#   --blind-rating              Hide global averages to prevent user bias
#
# Example – Main Interface with login enforced:
#   python smartgallery.py --port 8189 --admin-pass yourpassword --force-login
#
# Example – Exhibition on port 8190:
#   python smartgallery.py --exhibition --port 8190 --admin-pass yourpassword --blind-rating

# --- START ---
python smartgallery.py
chmod +x run_smartgallery.sh then ./run_smartgallery.sh
🎖️ Special thanks to Martial Michel (@mmartial) for orchestrating Docker support and contributing to the core application logic.
Pre-built image available on DockerHub and Unraid Community Apps.
1. Run
docker run \
  --name smartgallery \
  -v /your/host/output:/mnt/output \
  -v /your/host/input:/mnt/input \
  -v /your/host/SmartGallery:/mnt/SmartGallery \
  -e BASE_OUTPUT_PATH=/mnt/output \
  -e BASE_INPUT_PATH=/mnt/input \
  -e BASE_SMARTGALLERY_PATH=/mnt/SmartGallery \
  -p 8189:8189 \
  -e WANTED_UID=`id -u` \
  -e WANTED_GID=`id -g` \
  # --- OPTIONAL LAUNCH PARAMETERS via CLI_ARGS ---
  # Uncomment and edit the line below to enable additional features:
  # -e CLI_ARGS="--admin-pass yourpassword --force-login"
  #
  # Available parameters (combine as needed in CLI_ARGS):
  #   --admin-pass yourpassword   set the admin password (username will be: admin)
  #   --force-login               require login even on local network
  #   --exhibition                start in Exhibition Mode (use a different -p port, e.g. 8190:8189)
  #   --enable-guest-login        allow anonymous access in Exhibition
  #   --blind-rating              hide global averages to prevent user bias
  mmartial/smart-comfyui-gallery
2. Update
# Pull latest image
docker pull mmartial/smart-comfyui-gallery

# Stop and remove the old container
docker stop smartgallery && docker rm smartgallery

# Re-run with the same docker run command above
For the full Docker guide including docker-compose and advanced options, see DOCKER_HELP.md on GitHub.
🚀 Launch Parameters
Main interface
All parameters are optional. Launched with no flags, the main interface runs on port 8189 and treats you as system admin automatically when accessed from the local network.
Flag
Required
Description
--port <number>
Optional
Override the default port (8189). Use a different port to run the main interface and Exhibition at the same time.
--admin-pass <pwd>
Optional*
Set or reset the Admin password. Required whenever you need user management: creating accounts, assigning roles, managing access. Without it, user management is unavailable. Must be at least 8 characters. Once set, log in with username admin (lowercase, fixed) and this password.
--force-login
Optional*
Enforces authentication on the main interface. Must always be combined with --admin-pass. Use when accessing the main interface from outside the local network or from a shared server.
--blind-rating
Optional
Forces Blind Rating mode globally. Useful if you want team members in the main UI to vote without bias.
* --admin-pass and --force-login are individually optional but must be used together when either is specified.
⚠️ Exposing the main interface outside your local network? Always use --admin-pass and --force-login together, without exception. This applies in every scenario where the main interface is reachable from the internet: checking your gallery from your phone while you are out, a remote STAFF member working from home, a geographically distributed team. Without these two flags the interface is open to anyone who finds the URL. With them, every access requires a valid login.
Exhibition instance
Flag
Required
Description
--exhibition
✓ Yes
Start in Exhibition Mode. Disables physical folder browsing; only assigned or public collections are visible.
--admin-pass <pwd>
✓ Yes
Set or reset the Admin password. Required to enable user management and protect the instance. Must be at least 8 characters. Once set, log in with username admin (lowercase, fixed) and this password.
--port <number>
✓ Yes
Override the default port (8189). A different port is required to run Exhibition alongside the main interface simultaneously.
--enable-guest-login
Optional
Shows a "Login as Guest" button on the auth screen. No account needed to browse Exhibition.
--blind-rating
Optional
Blind Rating Mode. Hides global average ratings from the UI. Users see and sort only by their own personal ratings, ensuring unbiased curation feedback from clients and guests.
💡 Main interface and Exhibition: independent instances
SmartGallery has two interfaces: the Main Interface (your personal workspace) and Exhibition (the sharing portal). They are completely independent. Run one or both, whenever you need them. Neither requires the other to be active.
Scenario 1: Solo user, no sharing needed
If you used SmartGallery v1 as an advanced file manager and have no need to share your work, nothing changes. Launch it exactly as before, with no extra parameters:
python smartgallery.py
What is new in v2 that you can start using immediately, without any additional setup:
Virtual Collections: group files from different folders into named albums without moving anything on disk. Open the Collections tab in the left sidebar and click + to create one.
Status tags: mark any image with a workflow state using keys 1 to 5. For example, press 5 to flag a file as "To Edit" and come back to it later. Browse all files with a given status from the Status tab in the sidebar.
Ratings and personal notes: press G on any image in the grid or lightbox to open the Details panel. Assign a 1 to 5 star rating and write a note to yourself. These notes are searchable: use the comment keyword filter to find any image by words you wrote in your own comments.
Clean export: if you want to send a file to someone without exposing your ComfyUI workflow and models, press Shift+W. You get a pixel-perfect copy with all metadata stripped.
Scenario 2: Sharing your work via Exhibition
Exhibition is a separate, read-only portal you share with clients, collaborators, or anyone you want to show your work to. Here is how to set it up from scratch.
Step 1: Launch the Main Interface with authentication. Add --admin-pass and --force-login to your existing launch script or run:
Log in at http://localhost:8189 with username admin (lowercase) and the password you set above.
Step 2: Create Collections and set Permissions. In the left sidebar, open the Collections tab and click +. Give each collection a name. You can toggle it as "Exhibition Ready" (public for everyone in the portal), or click the `⋮` menu -> 👥 Share / Permissions to assign it exclusively to a specific client.
Step 3: Create user accounts. Click the user management icon at the bottom of the sidebar. Create an account for each person who will access Exhibition. For clients and external viewers, assign the role CUSTOMER or USER. Share their credentials and the Exhibition URL with them directly.
Step 4: Launch Exhibition. Open a second terminal or script and run:
Share http://youraddress:8190 with your users. They will see only the collections assigned to them, with no prompts, no workflow data, and no folder structure. They can leave star ratings and comments on individual images. You can read and reply to their feedback from the Main Interface at any time.
You do not need to run both instances at the same time permanently. Launch Exhibition only when you have something to share, and shut it down when the review session is over. The two instances are independent: the parameters shown above are the only additions to your existing launch script. All other paths and settings you already have configured remain unchanged.
Scenario 3: Small team working together (Blind Rating)
The team lead runs the Main Interface with --force-login and --admin-pass so the workspace is password-protected. Each team member gets a STAFF account and logs into the same Main Interface remotely to review files, apply status tags, and leave internal comments on specific images.
When work is ready for a client, a CUSTOMER account is created, the relevant Collections are mapped, and Exhibition is launched on a separate port. To prevent the client (or team members) from being influenced by what others voted, the lead launches Exhibition with the --blind-rating flag:
Now, when clients log into http://youraddress:8190, they cannot see the global average score. They only see their own stars. Admins reviewing the gallery can press B to toggle the blind mode off temporarily and see the real consensus.
All feedback runs through the same database, with no file transfers, no email threads, and no ZIP files.
The two instances can run at the same time from two separate terminals or scripts, or independently whenever needed. The parameters below are all you need to add to your existing launch command:
Python: two terminals or scripts
# Terminal 1: Main interface
python smartgallery.py --port 8189 --admin-pass yourpassword --force-login

# Terminal 2: Exhibition (launch only when needed, with Blind Rating active)
python smartgallery.py --exhibition --port 8190 --admin-pass yourpassword --blind-rating
Docker port mapping: the syntax is HOST:CONTAINER. Both containers run internally on port 8189, but are reachable at :8189 and :8190 respectively on your machine. They share the same data volumes, so files, tags, and collections are visible in both.
🔧 Reverse Proxy
A reverse proxy lets you serve SmartGallery over a clean URL or on port 80/443. Configure one block per instance: main interface on 8189, Exhibition on 8190.
# main interface (port 8189)
<Location "/studio/">
    ProxyPreserveHost On
    ProxyPass http://127.0.0.1:8189/galleryout/
    ProxyPassReverse http://127.0.0.1:8189/galleryout/
</Location>

# Exhibition (port 8190)
<Location "/gallery/">
    ProxyPreserveHost On
    ProxyPass http://127.0.0.1:8190/galleryout/
    ProxyPassReverse http://127.0.0.1:8190/galleryout/
</Location>
🌍 Sharing Exhibition Over the Internet (No IT Required)
If you don't have a server or a domain name but want to share your Exhibition with someone outside your home network, the simplest approach is a tunnel service. These tools create a temporary public URL that forwards to your local machine: no router configuration, no static IP, no hosting fees.
Recommended: ngrok
Works on Windows, macOS and Linux. Free tier is enough for personal use. Creates a public https:// URL that forwards to your local Exhibition port.
Step 1: Install ngrok
# macOS (Homebrew)
brew install ngrok

# Windows: download the .exe from ngrok.com/download
# Linux
curl -sSL https://ngrok-agent.s3.amazonaws.com/ngrok.asc | sudo tee /etc/apt/trusted.gpg.d/ngrok.asc
echo "deb https://ngrok-agent.s3.amazonaws.com buster main" | sudo tee /etc/apt/sources.list.d/ngrok.list
sudo apt update && sudo apt install ngrok
Step 2: Start your Exhibition instance, then open the tunnel
ngrok http 8190
ngrok will print a URL like https://a1b2c3d4.ngrok.io. Share that link with your client. It stays active as long as you keep ngrok running. On the free tier the URL changes every time you restart ngrok.
Alternatives to ngrok
If ngrok doesn't suit you, these tools work the same way:
Cloudflare Tunnel (free, no bandwidth limit, permanent URL even on free plan): best for long-term sharing. Requires a free Cloudflare account.
Tailscale: connects your devices in a private network. Better for sharing with people you trust (family, collaborators) rather than anonymous clients.
Localtunnel (npx localtunnel --port 8190): no account needed, truly instant, but less stable for long sessions.
💡 Tip: You can tunnel either or both ports. Exhibition (8190) is for clients and guests. Main interface (8189) is password-protected and perfectly usable remotely, handy for culling from your phone or working with a distributed team. Tunnel what you need.
Docker users: the same tools work exactly the same way. Run your Exhibition container with -p 8190:8189, then point ngrok or Cloudflare Tunnel at port 8190 on your host machine.
🎬 FFmpeg Notes
FFmpeg is required for video workflow extraction, dynamic waveforms, and transcoding. Common ffprobe paths:
🐳 Docker users: nothing to install. The official Docker image (mmartial/smart-comfyui-gallery) already includes FFmpeg and ffprobe. Video transcoding and storyboard generation work out of the box with no additional configuration.
If you are coming from v1.x, you will notice that the left sidebar has grown. What used to be just a folder tree is now split into three tabs, each giving you a different way to navigate your entire library:
The three-tab sidebar: Folders, Collections, and Status.
Folders: the familiar directory tree you already know. Browse your ComfyUI output folders, any mounted external drive, or any folder you have pointed SmartGallery at.
Status: navigate by workflow state. Click any color label (Approved, Rejected, Review, Select, To Edit) to instantly see all files carrying that status, across every folder at once.
Collections: navigate your virtual albums. Private collections are visible only to you and your team; Exhibition Ready collections are the ones you expose in Exhibition for clients and guests.
The three tabs give you three completely different lenses on the same library. You can go from "show me everything I marked for review today" to "show me what my client will see" in a single click.
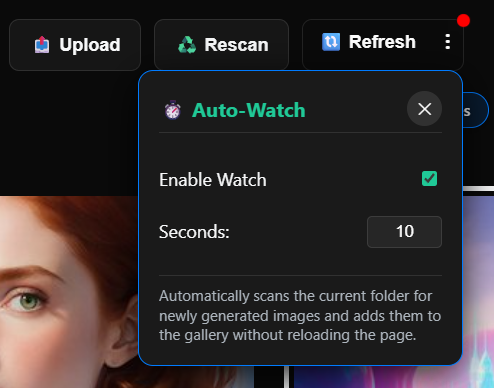
⚡ Auto-Watch & Real-Time Culling
SmartGallery is designed to be used while ComfyUI is generating. You never have to wait for a batch to finish to start curating.
Enabling Auto-Watch:
Click the ⋮ (three-dot) button next to the Refresh button in the top-right toolbar.
Open the Auto-Watch popover and enable the toggle.
Set your polling interval (e.g., 10 seconds).
New files appear in the grid the moment ComfyUI saves them. Your scroll position is never disturbed.
Auto-Watch: enable the toggle and set an interval. A pulsing red dot confirms it's active.
The culling loop: As images appear, hover and press Del to trash bad seeds instantly, or F to favorite the keepers. Apply status tags with 1–5. Move selects to a folder with M. Everything happens live, in parallel with generation.
📦 File Operations & Uploads
SmartGallery acts as a full file manager for single files or massive batches.
Selection:
Hover and click the ✓ checkmark top-left, or press X / Space.
Range select: Select one file, hold Shift, and click another. Everything between gets selected.
Ctrl+A to select all. Esc to deselect all.
Operations (on selection):
Move / Copy to Folder: Click the ⋮ in the selection bar. A modal shows your full folder tree.
Download as ZIP: Generates an archive on the fly. Shortcut: Z.
Delete: Permanent by default. Set the DELETE_TO environment variable to redirect deletes to a Trash folder instead.
Magic Upload: Click "Upload" or drag & drop files from your PC or smartphone directly into any folder. ComfyUI metadata is extracted automatically on the fly.
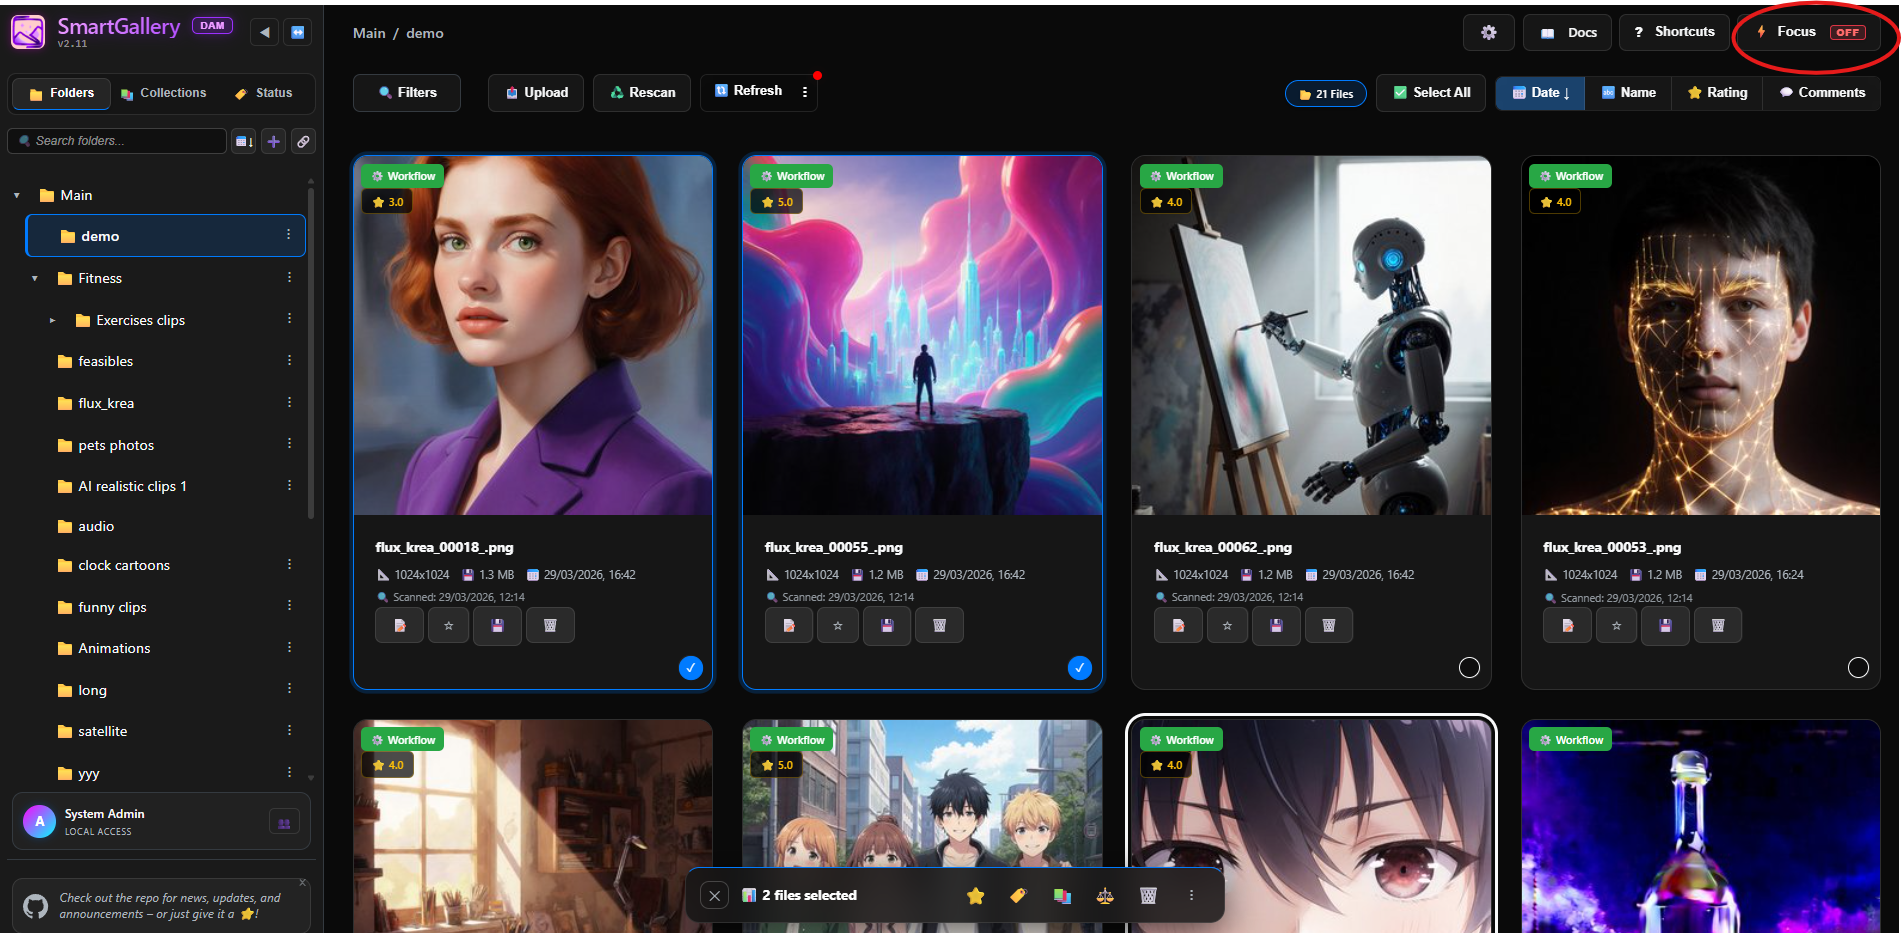
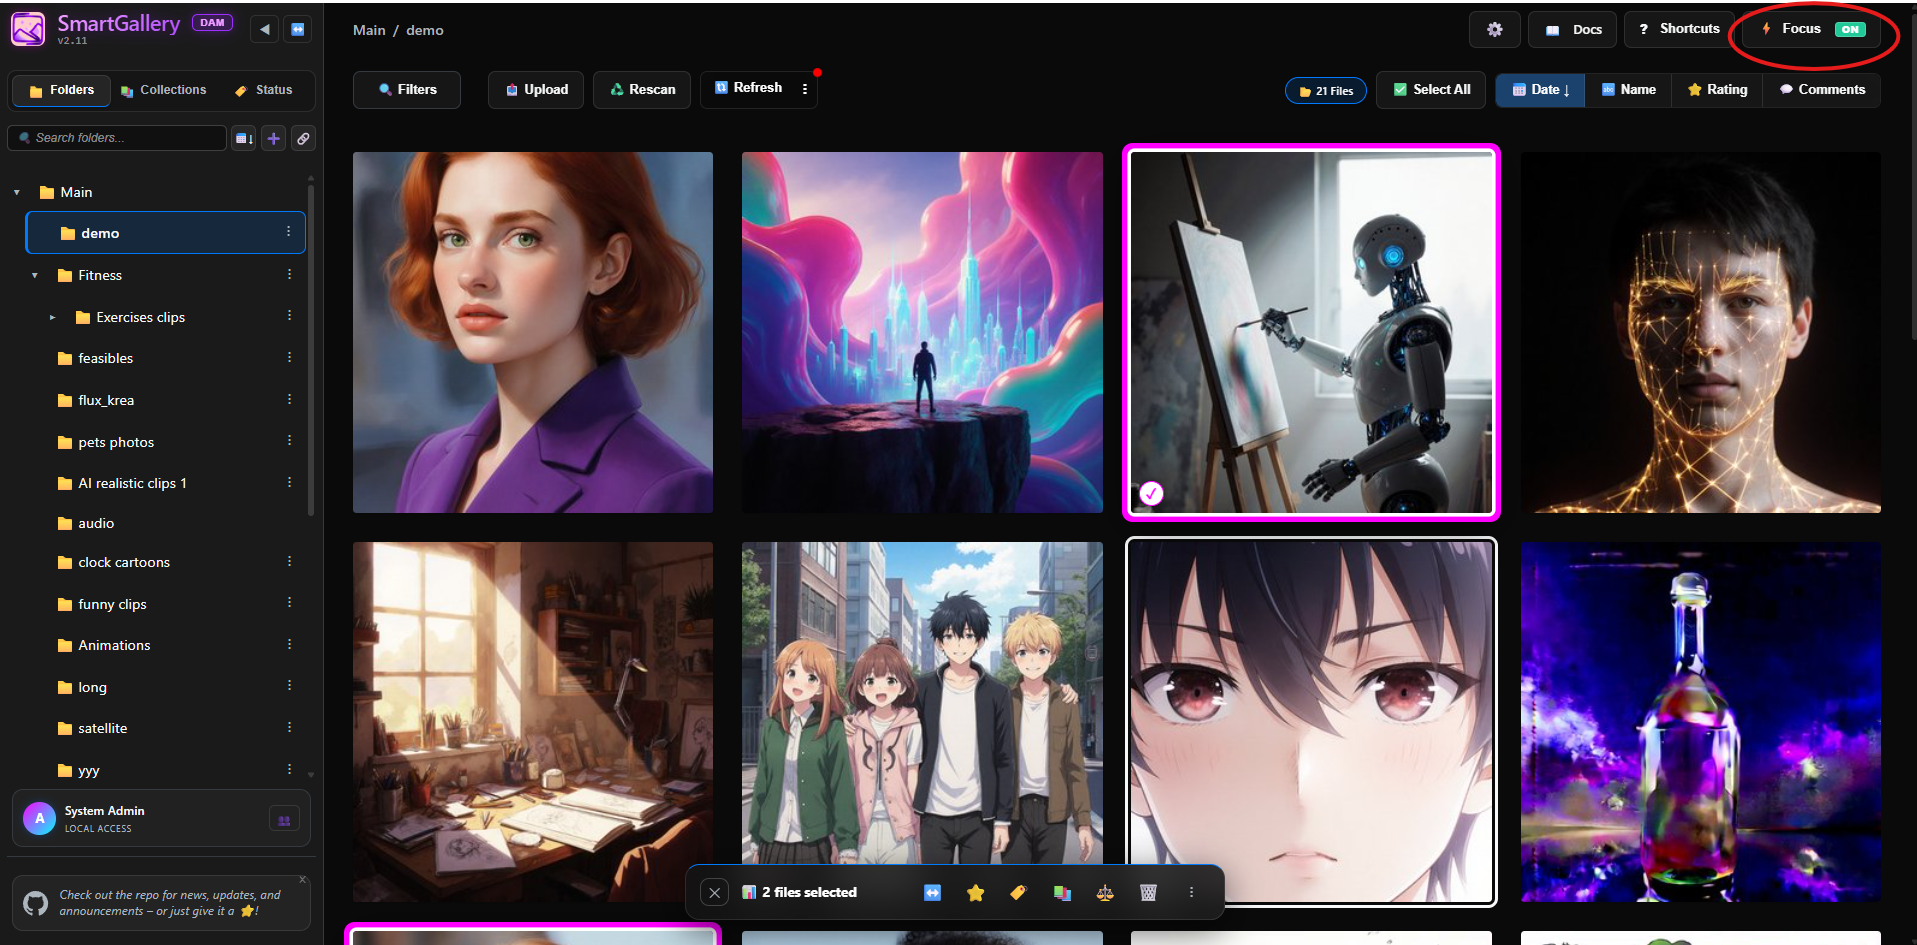
🎨 UI Customization & Focus Mode
Focus Mode: Press Q to hide all sidebars and toolbars. Maximum screen space for pure curation. In Focus Mode, clicking an image selects it (instead of opening it); press V or Enter to open the Lightbox.
Compact Thumbnails: Click ⚙️ Options → toggle Thumbnail Size to Compact. Fit significantly more images on screen at once.
Video Autoplay: Press P to toggle. Turn off when browsing hundreds of videos to save CPU/bandwidth.
Persistent Metadata Hover Bar: When Focus Mode is OFF, hovering over an image in the Gridview reveals a sleek status bar at the bottom of the screen showing exact dimensions, calculated megapixels, file size, and current rating status instantly.
Focus OFF: hover cards and metadata visible.
Focus ON: clean grid with fuchsia selection borders.
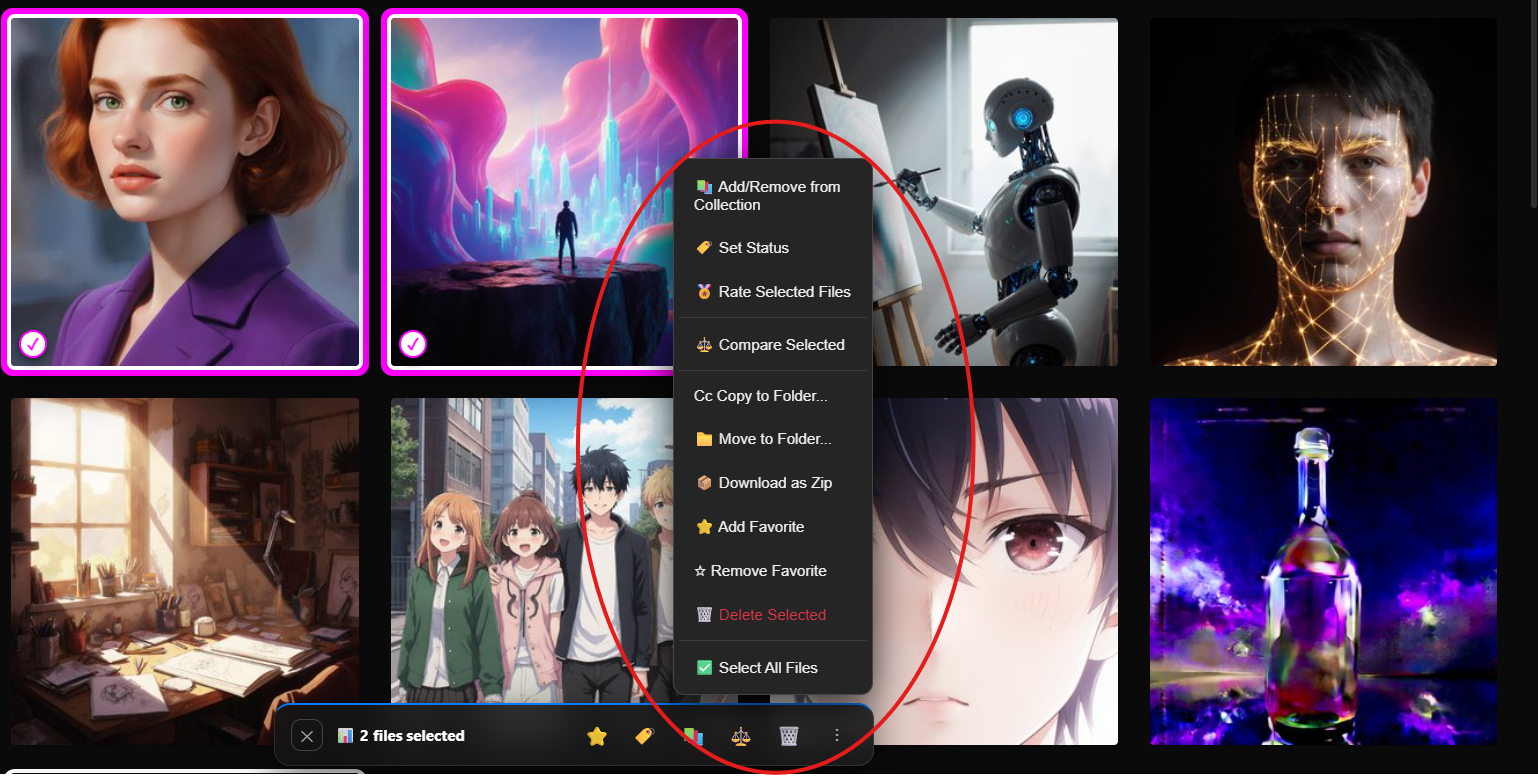
📋 Batch Selection Bar
Select any image with the ✓ checkmark (or press X / Space in Focus Mode) to activate the floating batch bar at the bottom of the screen.
Batch selection bar: context menu open with all available batch actions.
Available batch actions:
✕ Deselect All: Clears the selection.
↔️ Range Select: Appears when exactly 2 files are selected. Selects all files between them in the current view.
⭐ Add Favorite: Marks all selected files as favorites.
🏷 Set Status Y: Applies a pipeline color tag to the entire batch at once.
📚 Add/Remove from Collections A: Opens a modal to add or remove the batch from any virtual album.
🏅 Rate Selected Shift+R: Apply a 1–5 star rating to multiple files in a single action.
📁 Move / Copy: Transfer files to another physical folder.
📦 Download as Zip Z: Packages the selection into a downloadable .zip file.
🗑️ Delete Selected: Permanently deletes the selected files (requires confirmation).
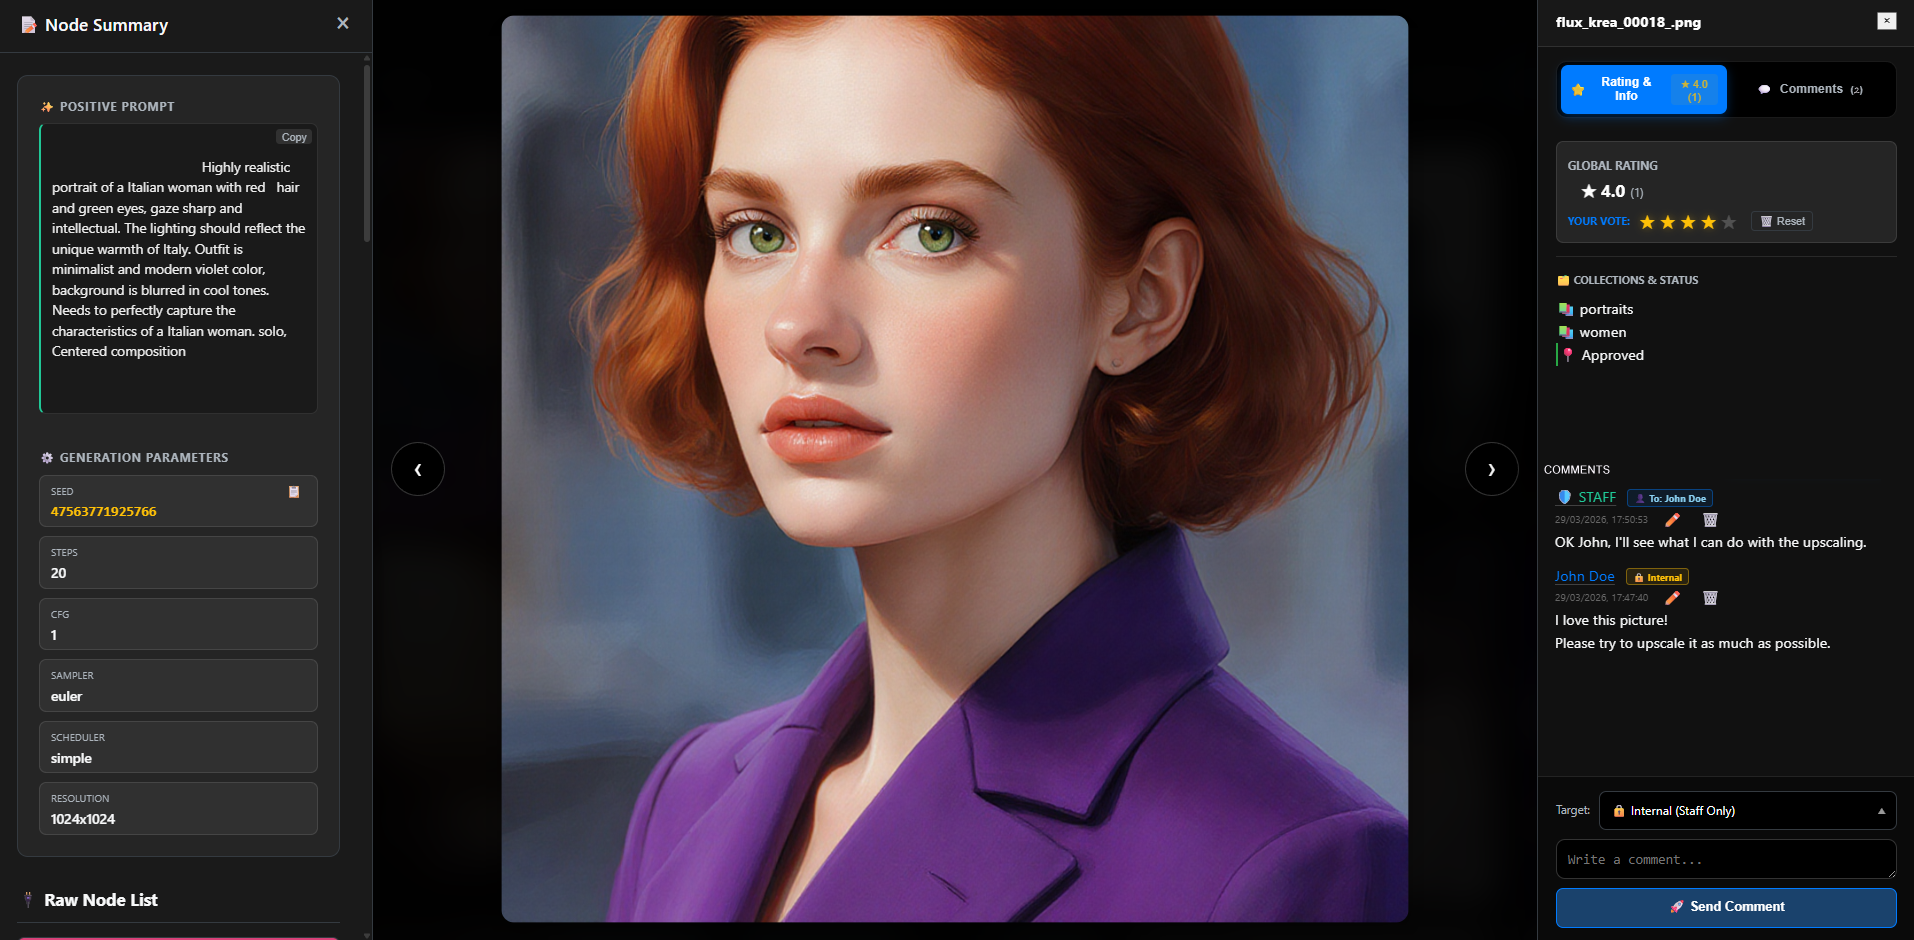
🖼️ Lightbox (Full-Screen Media Viewer)
Open the full-screen Lightbox with V or Enter. When Focus Mode is OFF, clicking an image directly also works. Inside the Lightbox you can pan and zoom freely.
Lightbox Viewer
The Lightbox: Node Summary (left), full resolution image (center), Ratings & Comments panel (right).
The Lightbox toolbar with all action buttons.
Key Lightbox actions:
Navigate:← / → to move between files. The grid order is preserved.
Media Controls: Press Space to Play/Pause video or audio, use ←/→ to seek by 5 seconds, and M to mute/unmute.
Zoom & Pan:+ / - to zoom; drag to pan; 0 to reset.
Rotate:T rotates 90° — the rotation is visual only (non-destructive).
Download original:S downloads the original file with all embedded metadata intact.
Clean Export:Shift+W downloads a pixel-perfect copy stripped of all prompts, workflow data and EXIF. Safe to send to anyone.
Node Summary:N opens the full ComfyUI generation dashboard.
Ratings & Comments:G opens the side panel for rating and messaging.
Download / Copy Workflow:W to download the raw .json workflow; C to copy it to clipboard for direct paste into ComfyUI.
Rename:R renames the file on disk immediately.
Move:M closes the Lightbox and opens the Move File dialog.
Video Storyboard:E generates the 11-frame storyboard grid (videos only).
Open in New Tab:O opens the full-resolution file in a new browser tab.
Clean View:H hides all toolbar buttons for distraction-free viewing. Press again to restore.
Quick Menu:/ opens a touch-friendly list of all available commands and shortcuts.
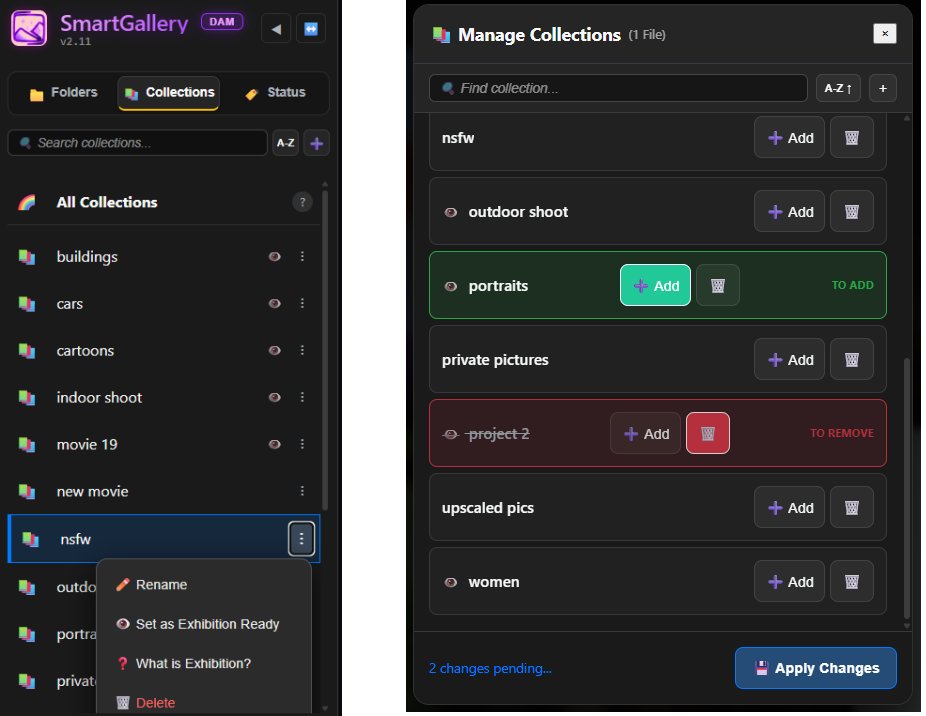
Group files from different physical folders into unified albums, without duplicating a single byte on disk. The physical files stay where they are.
Collections sidebar tab and Manage Collections modal.
Create: Go to the "Collections" tab in the left sidebar and click the + button.
Visibility toggle: Collections can be kept completely Private, marked as "Exhibition Ready" (visible to all guests in the portal), or you can use the 👥 Share / Permissions option from the context menu to assign exclusive viewing rights to specific clients or users.
Assign files: Select files → click the 🏷️ icon in the bottom bar → click a collection.
Remove from collection: Select a file inside a collection and press U. The physical file is untouched.
Collections are perfect for building client presentation albums, curated portfolios, or thematic series, all from your existing output folders.
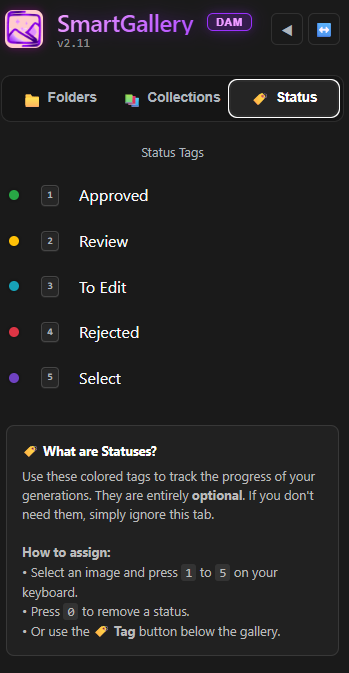
🏷️ Status Tags (Team Workflow)
Color-coded visual traffic lights for your entire team. Essential for review pipelines: anyone with main interface access sees the status at a glance.
The Status tab: all five pipeline states.
Vertical color bars indicate status on thumbnails.
Applying Status Tags:
Hover over any image (or select multiple), then press:
1 → Approved (Green strip)
2 → Rejected (Red strip)
3 → Review (Yellow strip)
4 → Select (Purple strip)
5 → To Edit (Blue strip)
0 → Remove status
💽 External Drive Mounting (Agnostic DAM)
SmartGallery is not restricted to ComfyUI. Mount any folder from your system or network.
How to mount:
Go to the "Folders" tab in the left sidebar.
Click the 🔗 Link icon in the toolbar.
A file browser opens. Navigate to any folder on your system (external drive, NAS, reference library…).
Give it a name and click "Create Link".
SmartGallery creates a safe Symlink/Junction. The folder appears in your sidebar with a 🔗 icon. All DAM features (Tags, Collections, Search) work on these files without moving them.
3. Search & Filtering
Click the 🔍 Filters button in the top toolbar to open the advanced search panel.
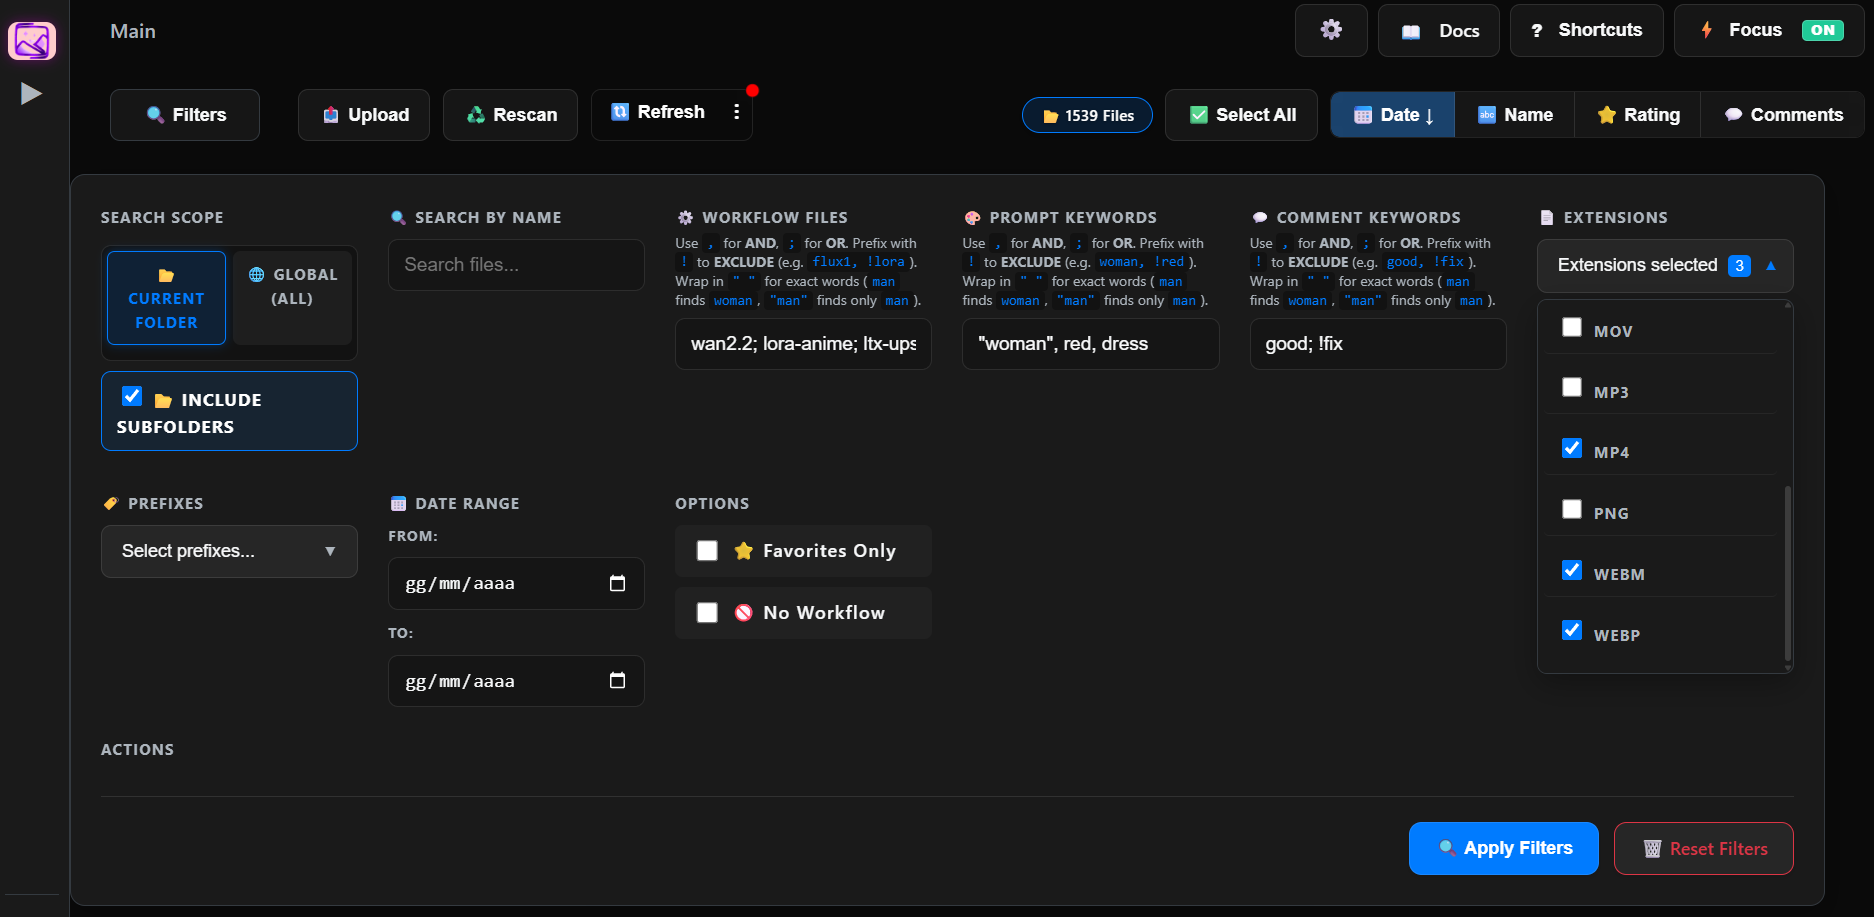
The Filters panel: search scope, multi-keyword fields, and sort options.
Scope: "Current Folder" for local search, or "Global" to search across your entire database instantly. Toggle "Include Subfolders" for recursive search within the current folder.
Multi-keyword logic — applies to Prompt Keywords, Workflow Files, and Comment Keywords:
Use , (comma) for AND — e.g., red, car must contain both
Use ; (semicolon) for OR — e.g., cat; dog contains either
Use ! (exclamation) for NOT — e.g., flux, !lora finds flux but excludes lora
Wrap in " " for Exact Match — e.g., "man" prevents matching woman (works also with NOT, e.g., !"bad anatomy")
Prompt Keywords: Type words from your positive or negative prompts (e.g., cyberpunk, neon).
Workflow Files: Find images generated with a specific Checkpoint or LoRA (e.g., sdxl_base.safetensors).
Comment Keywords: Search inside the text of any comment left by anyone, whether from the main interface or Exhibition (e.g., make it brighter, approved). Your entire feedback history is instantly searchable.
Advanced Ratings Filtering: Filter by specific Star Rating ranges (e.g., select both "1-2 stars" and "4-5 stars" at the same time) and by Specific Raters to quickly isolate feedback from key clients.
Technical Filters: Date ranges, file extensions, Favorites Only, No Workflow attached.
Advanced Sort Options: Sort by date, name, rating, or comment count. By clicking the dropdown arrow next to Rating or Comments, you access sleek sub-menus allowing you to instantly toggle between "Most/Least Discussed", "Uncommented", or "Not Rated" items effortlessly. A dedicated Newest Comments sort orders files by the most recent comment activity, making it easy to surface the latest client feedback.
4. Workflow Intelligence
📝 Node Summary Dashboard
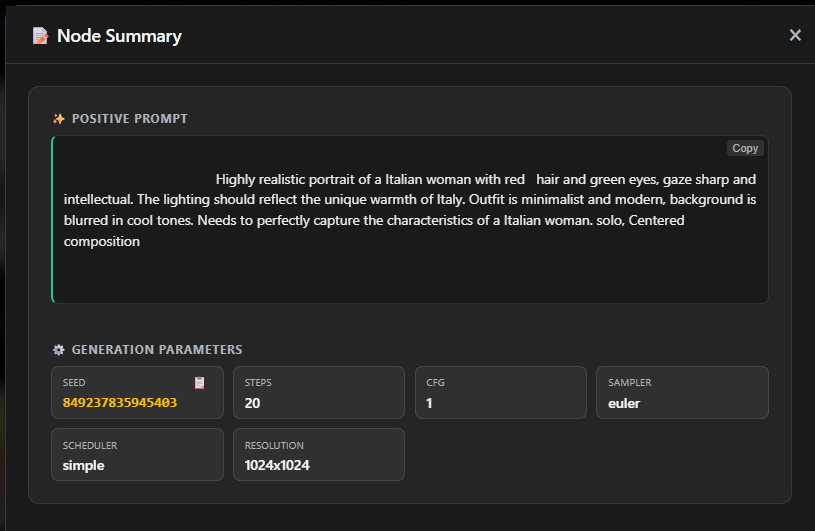
SmartGallery reads the embedded JSON workflow from generated images and videos, then presents it as a clean, readable dashboard.
Node Summary dashboard: generation parameters at a glance.
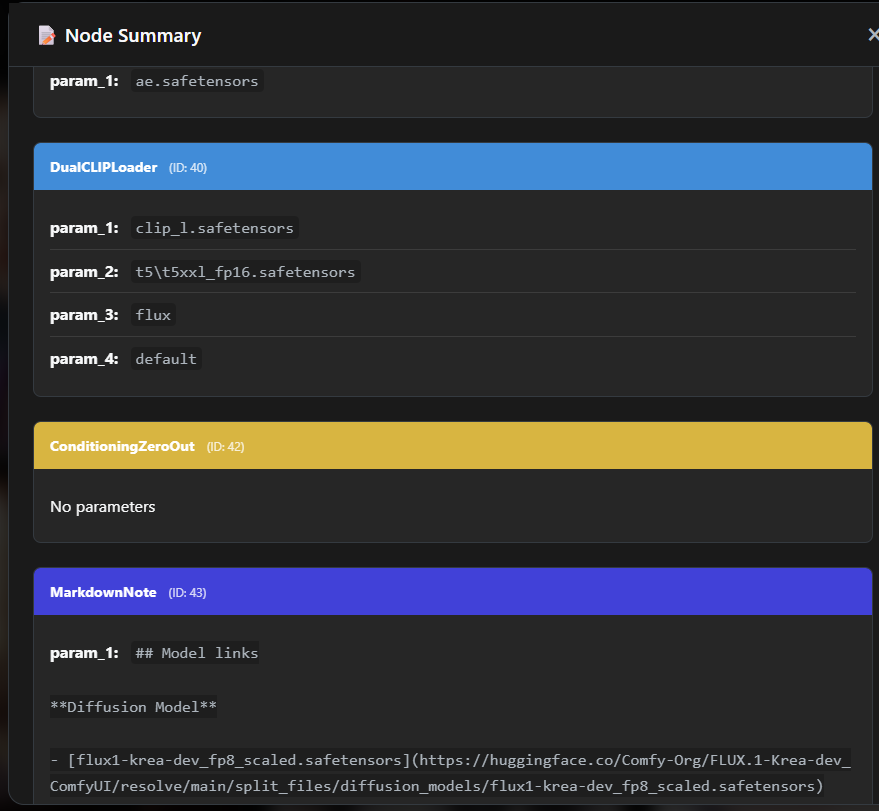
Raw Node List: complete scrollable list of every node in the workflow graph.
Open: Hover over an image and press N, or click the 📝 icon in the Lightbox toolbar.
Positive & Negative Prompts: Displayed cleanly with a one-click Copy button for each.
Generation Parameters: Seed (with a copy button), CFG, Steps, Sampler, Scheduler, and Resolution.
Active LoRAs: Every LoRA used in the workflow, listed with its weight.
Source Media (Inputs): If your workflow used Image2Image, ControlNet, or Video inputs, this section shows the source media directly inside the panel — you can view and download the original input files without leaving SmartGallery.
Raw Node List: A complete, scrollable list of every single node in the ComfyUI graph and all its parameters. Useful for deep debugging or full workflow reconstruction.
Download Workflow JSON: Press W to download the raw .json workflow file.
Copy Workflow JSON: Press C to copy to clipboard and paste directly back into ComfyUI.
Supports uploaded files: If you upload an image generated by someone else via the Magic Upload, SmartGallery extracts the workflow from it automatically.
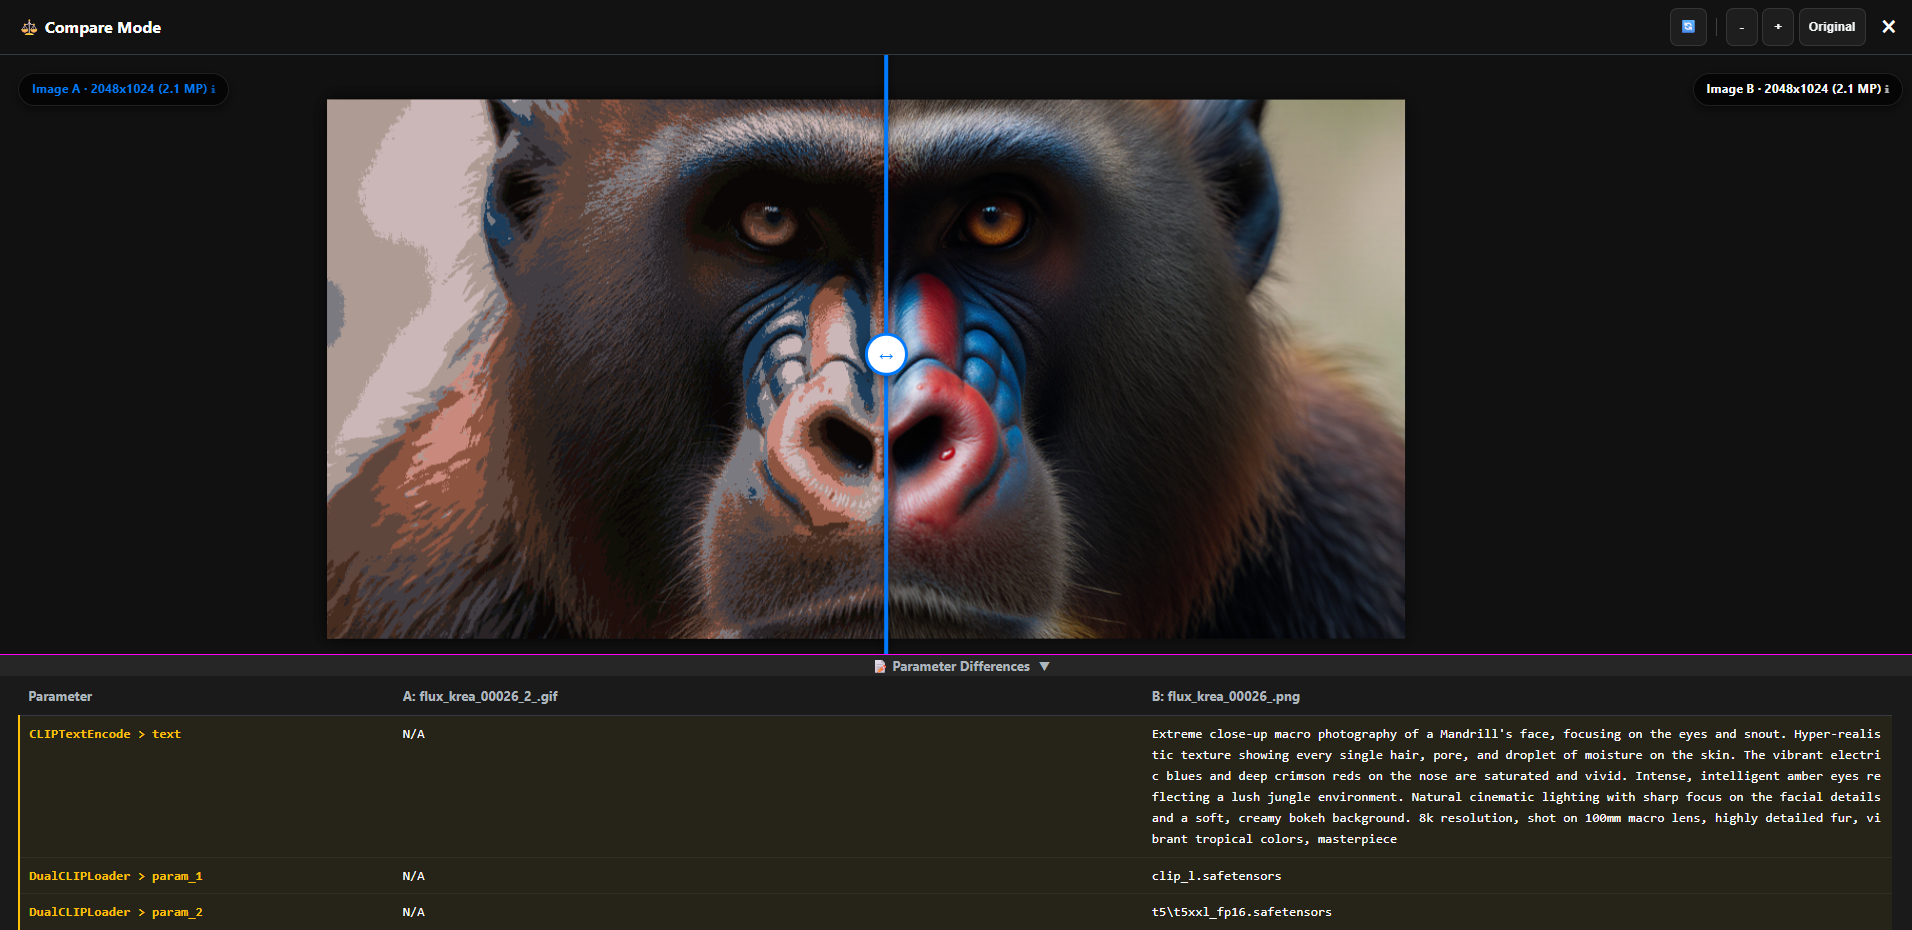
⚖️ Comparison Engine (A/B + Parameter Diff)
Find out exactly what changed between any two generations.
Compare Mode
Compare Mode: A/B visual slider and Parameter Differences table.
How to compare:
Select exactly 2 images using the checkmarks.
Click the ⚖️ Compare Selected button in the bottom selection bar.
An interactive A/B slider opens with synchronized zoom and pan.
Click "Parameter Differences" at the bottom for a table showing only the values that changed (e.g., Seed: 123 → 456, CFG: 7 → 9).
✦ Remix Workflow & The { } Nodepad
The Philosophy: "Suffer Only Once on the Canvas"
ComfyUI is incredibly powerful, but its node-based interface can be overwhelming. The philosophy behind the Remix feature is simple: endure building your perfect node setup once. Once you generate your media, let SmartGallery steal its "soul", extract the parameters, and save it as a clean Template. You will never have to look at the node canvas again.
▶
Remix Workflow in Action
Click to play
The 3-Tier Workspace Architecture
Getting started is immediate: just select an image or video and press B. SmartGallery dynamically adapts to your workflow's complexity:
1️⃣ Simple Tweaks: 📝 Auto-Form
The engine room. SmartGallery aggressively scans the embedded workflow and automatically exposes the most important editable parameters. Best for quick prompt or seed changes.
2️⃣ Build Your Dashboard: 🛠️ My Panel
Click the 📌 Pin icon next to the inputs you care about in the Auto-Form. Switch to My Panel to find a clean dashboard populated exclusively with your pinned fields. Use ↕ Reorder to sequence them perfectly.
3️⃣ Pro Control: { } The Nodepad
A revolutionary raw JSON editor. Live Dictionary Lookup: interrogates your ComfyUI server in real-time. Magic Injector: generates visual UI elements (dropdowns/uploads) to inject values safely without typing JSON. Favorite Nodes: Star a complex node to turn it into a Quick Edit button on your My Panel dashboard.
Workflow Library, Queueing & Autofix
Save to Library: Once your My Panel is perfect, save it. You can instantly recall Templates from the main Tools menu without needing a source image.
Batch Queueing: Set the generation count, toggle the Random Seed checkbox, and click 🚀 Queue to send jobs to ComfyUI in the background.
Companion PNG Recovery: Video files (MP4/WebM) often lack API payloads. Click 🔍 Find companion PNG to automatically find the sidecar image and restore your ability to queue videos directly!
⚠️ Quick & Dirty Disclaimer: This is a stateless helper tool for rapid iterations, not a replacement for ComfyUI's native canvas. For highly complex, unsupported custom nodes, use the 📋 Copy button to paste the raw workflow back into ComfyUI.
🛡️ Clean Export: Share the Image, Not the Recipe
When you need to share an image outside of Exhibition Mode without risking your workflow data.
How to use: Select an image and press Shift+W, or click the 🛡️ icon in the Lightbox. SmartGallery reconstructs the image pixel-by-pixel, stripping all EXIF data and embedded ComfyUI workflows, then downloads a pristine, safe copy to your computer.
Role-based protection: In Exhibition Mode, this stripping is automatic and enforced by role. CUSTOMER and GUEST roles can never access original files with workflow data, even if they try to download directly.
5. Media Tools
🎬 Video Transcoding
SmartGallery uses FFmpeg to handle heavy or unsupported video formats.
Supported natively: MP4, WEBM, GIF.
Auto-transcoded on the fly: ProRes, MKV, AVI, MOV are transcoded in the background for smooth browser playback.
Autoplay toggle: Press P to toggle video autoplay in the grid. Disable when viewing hundreds of videos to save resources.
🌊 Interactive Audio Waveforms
If you generate audio or videos with sound, set GENERATE_WAVEFORMS=true in your environment variables. SmartGallery will render visual waveforms mapping onto the playback seek bar. The player includes a rare real-time amplitude slider (🌊) that lets you visually scale the waveform height on the fly, ensuring clear visibility for both quiet and loud tracks without needing to regenerate any media.
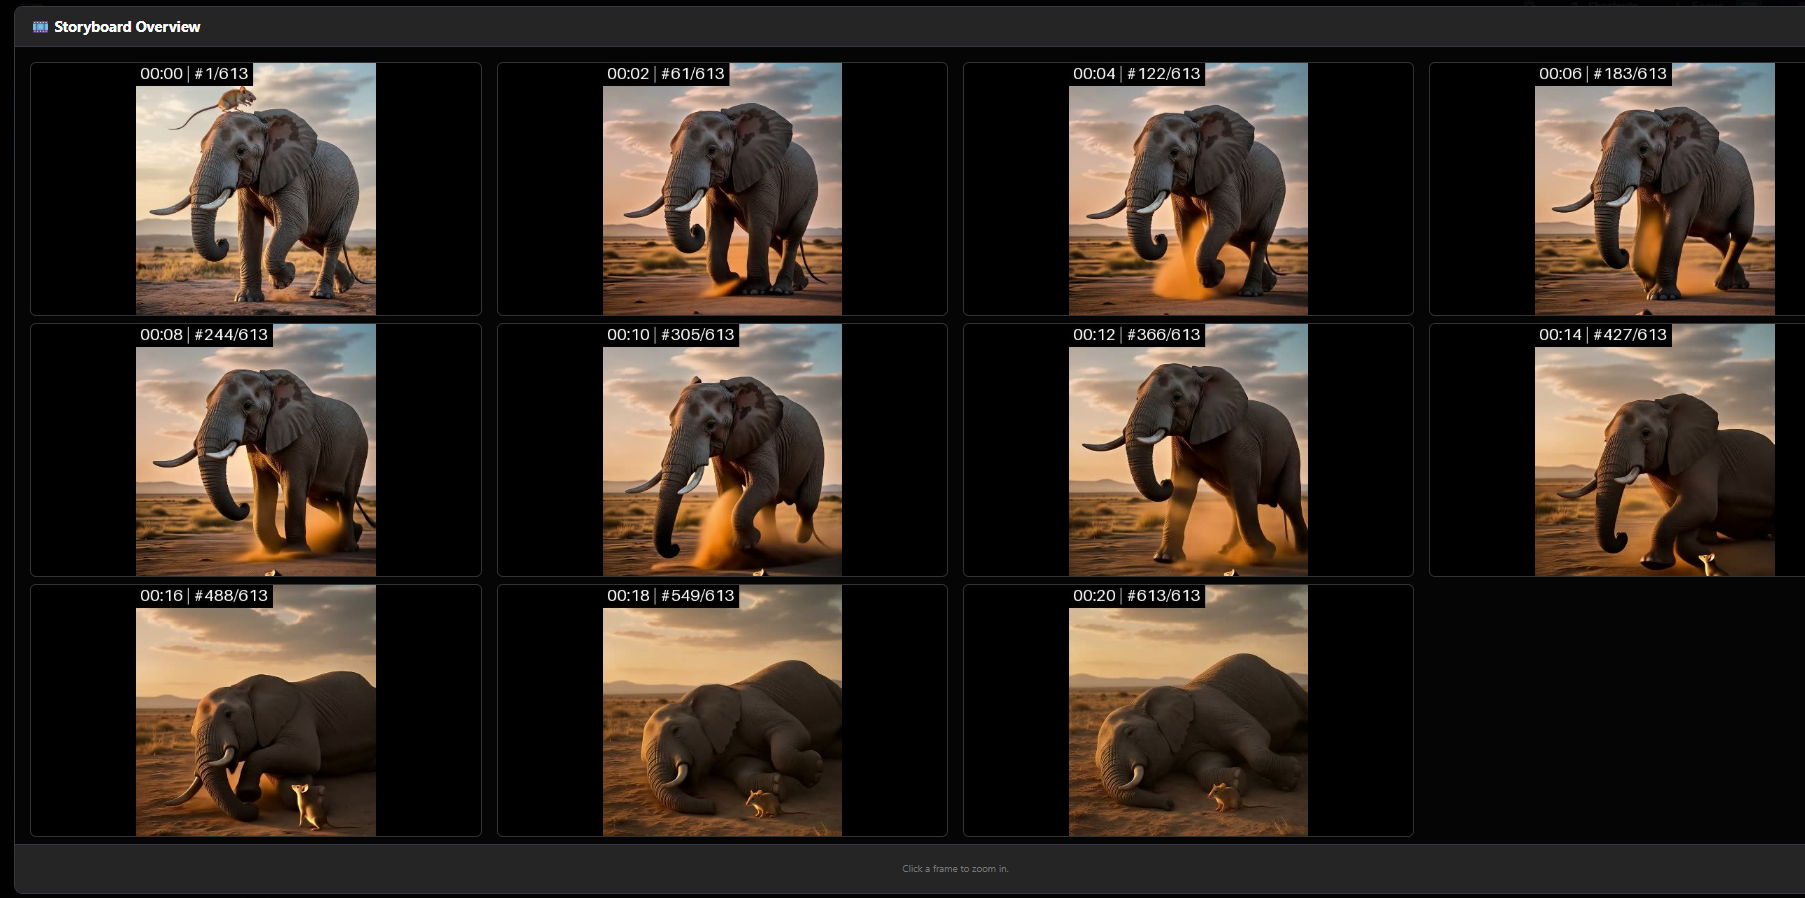
🎞️ Video Storyboards
Review long video files instantly without scrubbing.
Video Storyboard: 11 evenly-spaced frames extracted from the video.
How to use: Open a video in the Lightbox and press E (or click the filmstrip icon). The system extracts 11 perfectly-spaced frames and presents them in a grid. Click any frame to view it full resolution with timestamp data.
6. Exhibition Mode & Collaboration
🎭 Exhibition Mode Setup
Exhibition Mode transforms SmartGallery into a secure, read-only client portal. Physical folder browsing is disabled, workflows are hidden, and only assigned or public collections are visible.
Use cases: Client approval portals, family photo sharing, art portfolio showcases, team review sessions: anything where you want a clean presentation without exposing your tools.
For Docker, use -p 8189:8189 for the main interface and -p 8190:8189 for Exhibition. Both containers share the same data volumes. See the Installation section for the full Docker dual-instance setup.
Exhibition Ready vs Private Collections: Only collections explicitly marked "Exhibition Ready" or shared with specific users appear in Exhibition. Everything else is completely invisible.
Guest login: Add --enable-guest-login to allow anonymous browsing without an account.
Network setup: Both ports can be exposed externally if needed. The main interface requires login and is password-protected. If you only want clients to access a curated view, expose Exhibition only. If your team works remotely or you browse from your phone, expose the main interface too. Your call.
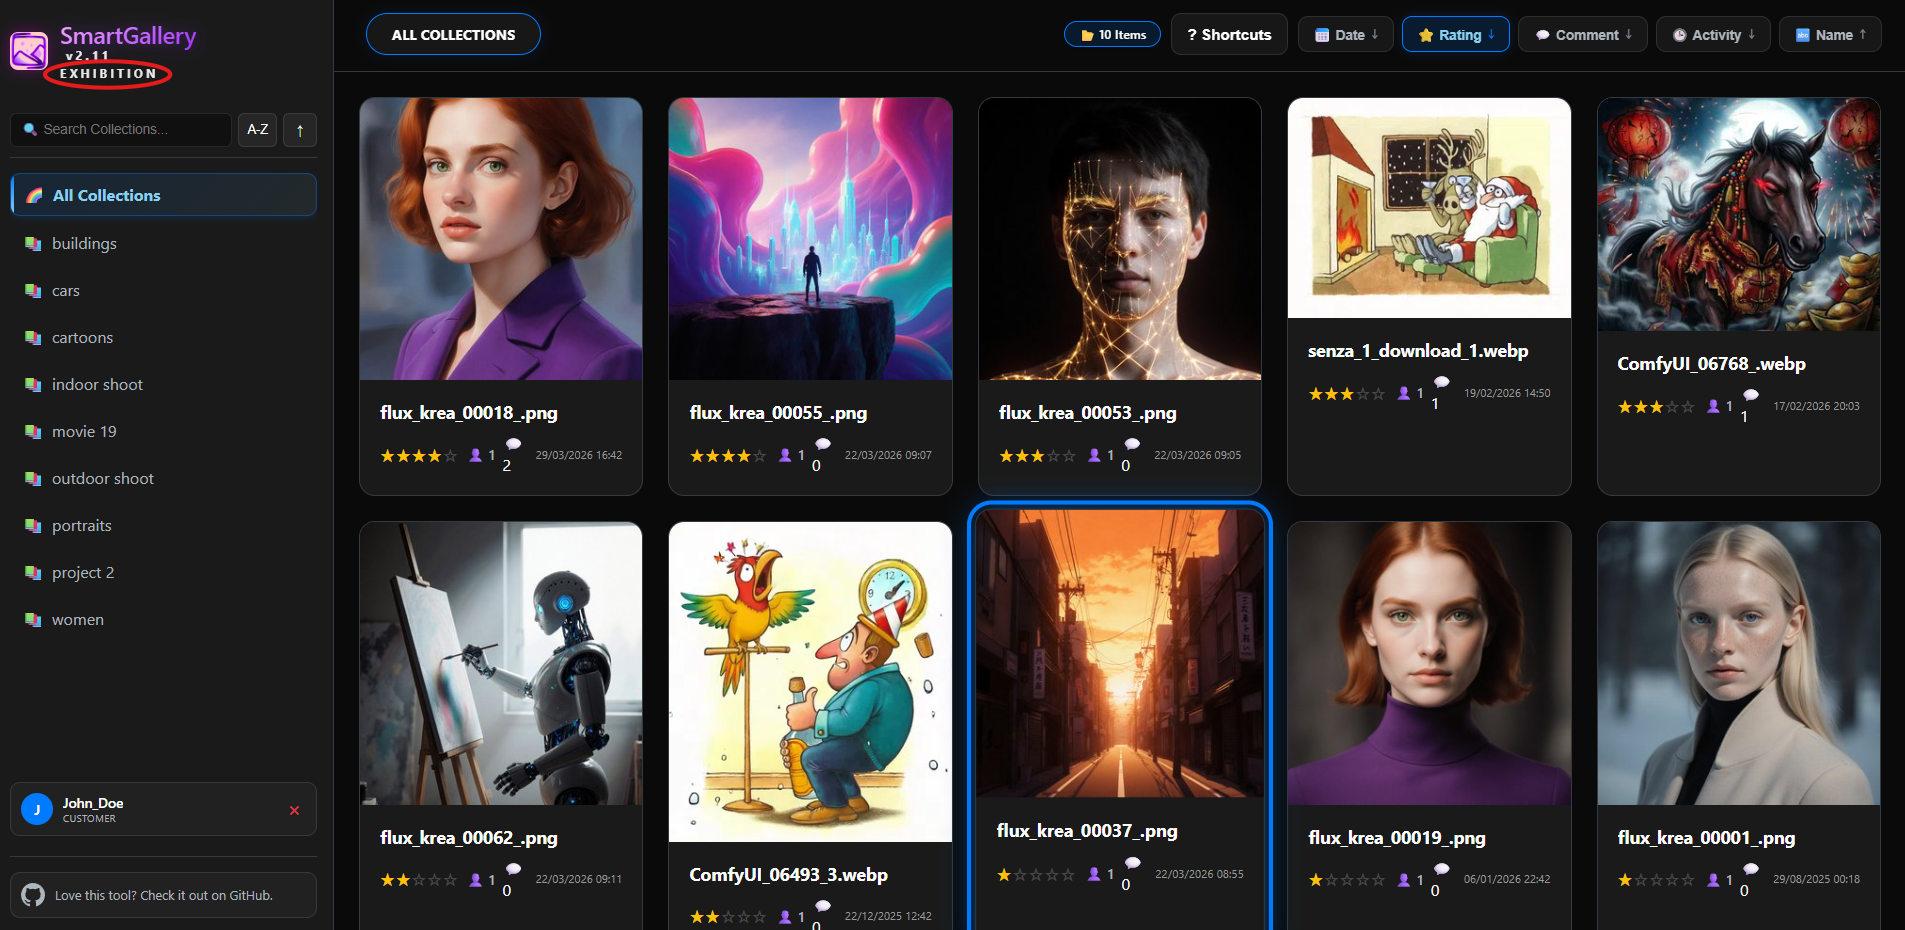
smartgallerydam.com:8190 · Exhibition
What your client sees: a clean, secure gallery. No prompts, no workflows, no clutter.
💬 Ratings & Live Comments
Ratings and comments are not just for clients. Any logged-in user can rate and comment on images, whether they access the gallery through the main interface or through Exhibition. A solo artist can rate their own work and leave notes to themselves. A team member can flag issues. A client can approve. All from the same system, with role-appropriate visibility.
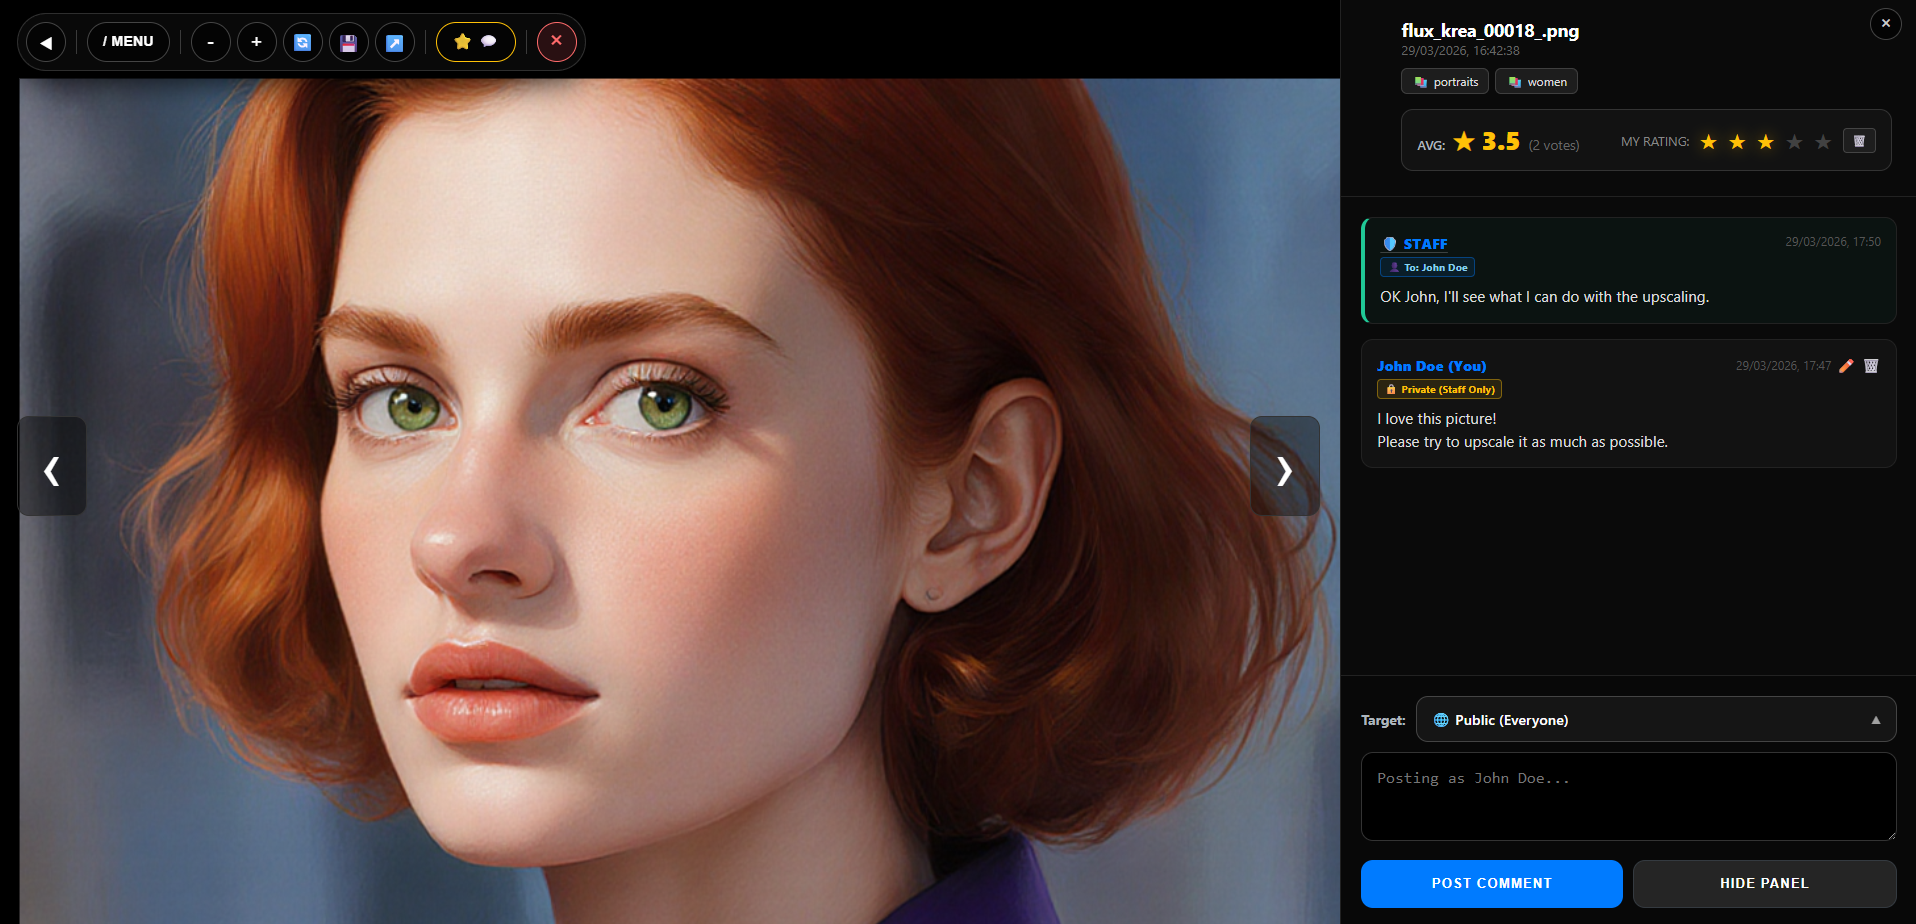
The Ratings & Comments panel showing global rating and personal vote.
Rating Transparency: 1–5 stars per user. The Global average is displayed instantly. You can click the "Details" icon (👁️) next to the global rating to see a list of exactly who assigned which score.
Blind Rating System: Launch the server with `--blind-rating` to force blind voting globally. In this mode, users see only their own ratings and the global average is hidden. This prevents group bias. Admins and Staff can temporarily bypass this using the B key or the "My Ratings" toggle.
Comments: Real-time, per-image. Main interface users (artists, staff) and Exhibition users (clients, friends, guests) can all post, based on their role.
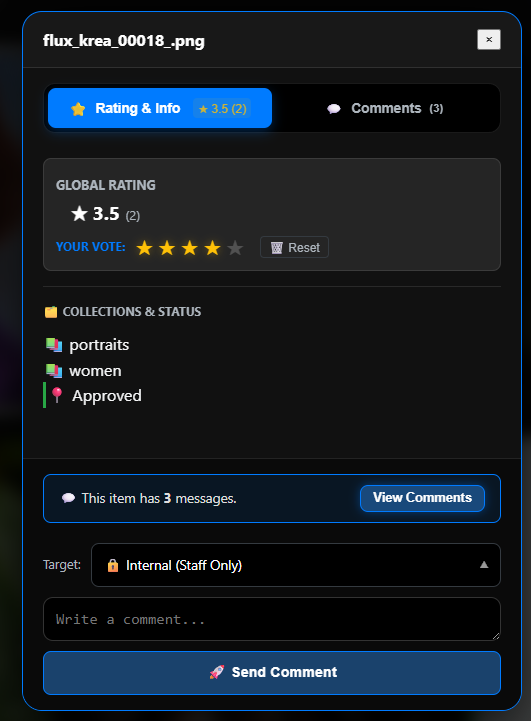
📨 Message Visibility: Per-Message Control
Visibility is chosen individually for each message, directly inside the comment panel. When writing a comment on any image (press G or click the 💬 icon in the Lightbox), a Target / Visibility dropdown appears above the text input, letting the author decide exactly who can read that message before posting.
Public announcements, internal team notes, and private client replies can all coexist inside the same gallery instance at the same time.
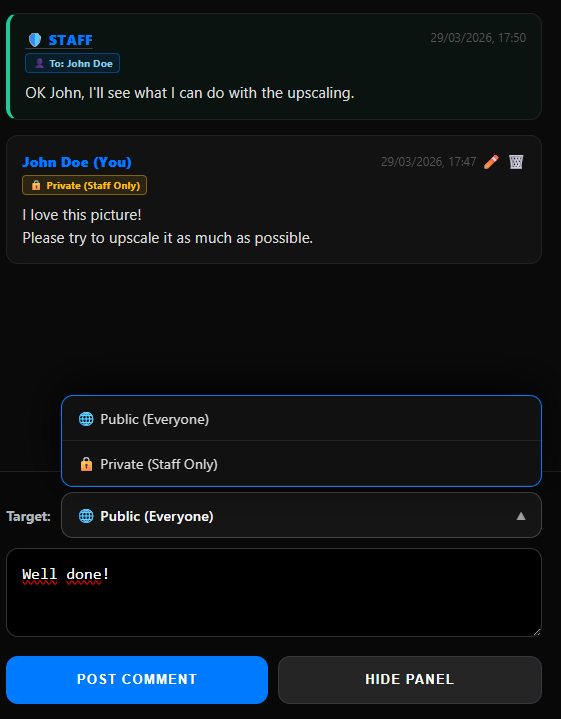
Comments thread showing visibility dropdown and badges.
Staff visibility options (Admin, Manager, Staff)
Staff members can see all messages regardless of their visibility level. When writing, they can choose from three options:
🌐 Public (Everyone): Visible to any user who can access the gallery, including guests.
🔒 Internal (Staff Only): Visible only to Admin, Manager and Staff. Ideal for technical notes, pre-delivery reviews, or any internal discussion that clients should not see.
👤 Direct Message (To User): Selecting a specific registered user from the dropdown sends a private message visible only to that user and to Staff. A quick way to trigger this is to click directly on the name of the user above one of their existing comments: the dropdown preselects them automatically.
Customer and Guest visibility options
Clients and guests cannot send direct messages to other users. When they write a comment, they choose between:
🌐 Public (Everyone): The message is visible to all gallery visitors, similar to a public comment on a social network.
🔒 Private (Staff Only): The message is marked Internal and visible only to the production team. This is how a client leaves confidential feedback without other guests seeing it.
Visual badges: Every message in the comment thread displays a colored badge next to the author's name indicating its privacy level: 🌐 Public, 🔒 Internal, or 👤 To: Name. At a glance, anyone reading the thread knows exactly who can see each part of the conversation.
127.0.0.1:8189/galleryout · Details Panel (G)
The ratings and comments panel: structured feedback on every asset, with role-aware visibility.
7. Access Control (ACL)
🔑 The System Admin
There is exactly one system admin, hardwired into SmartGallery. It is not a user profile you create: it is the built-in administrator whose password is set via the --admin-pass launch parameter. All passwords in SmartGallery, including the admin password, must be at least 8 characters long. This admin account is shared across both the main interface and Exhibition, since both instances connect to the same user management panel.
The admin username is always admin, lowercase, and cannot be changed. The only thing you set is the password via --admin-pass. When logging in, use exactly: username admin, password whatever you passed to --admin-pass.
If you launch the main interface on a local network without setting --admin-pass, SmartGallery detects this and lets you act as system admin automatically, with no login required. If SmartGallery detects that incoming requests are coming from outside the local network, it will ask you to relaunch with --admin-pass yourpassword --force-login to enforce authentication.
👥 Roles & Permissions
All user accounts beyond the system admin are assigned one of the following roles. The role determines which interface they can access and what they can do.
Role
Main Interface
Exhibition
Workflows visible
Downloads
User management
Admin(system)
✓
✓
✓ Full
Original + Workflow
✓ Both interfaces
MANAGER
✓
✓
✓ Full
Original + Workflow
✓ Both interfaces
STAFF
✓
✓
✓ Full
Original + Workflow
✗ No
FRIEND
✗
✓
✓ In file metadata
Original (with embedded metadata)
✗ No
USER
✗
✓
✗ Hidden
Metadata-stripped only
✗ No
CUSTOMER / GUEST
✗
✓
✗ Hidden
Metadata-stripped only
✗ No
Main interface access is restricted to Admin, MANAGER and STAFF. FRIEND, USER, CUSTOMER and GUEST can only access Exhibition.
What "workflow visible" means for FRIEND: FRIEND can download the original file with all its embedded metadata intact. The ComfyUI workflow data is stored inside the file itself: in the metadata of PNG images, but also inside video files and other supported formats. This means a FRIEND can load the file into a workflow inspector tool or into the SmartGallery main interface to read the full generation parameters. What FRIEND does not have is the Node Summary panel or a standalone JSON workflow download: those are exclusive to the main interface. USER, CUSTOMER and GUEST receive files with all metadata stripped, so no workflow can be extracted from their downloads.
👥 User Management & Analytics
The user management panel is shared between the main interface and Exhibition. Both instances connect to the same user database. It is accessible to Admin and MANAGER from either interface.
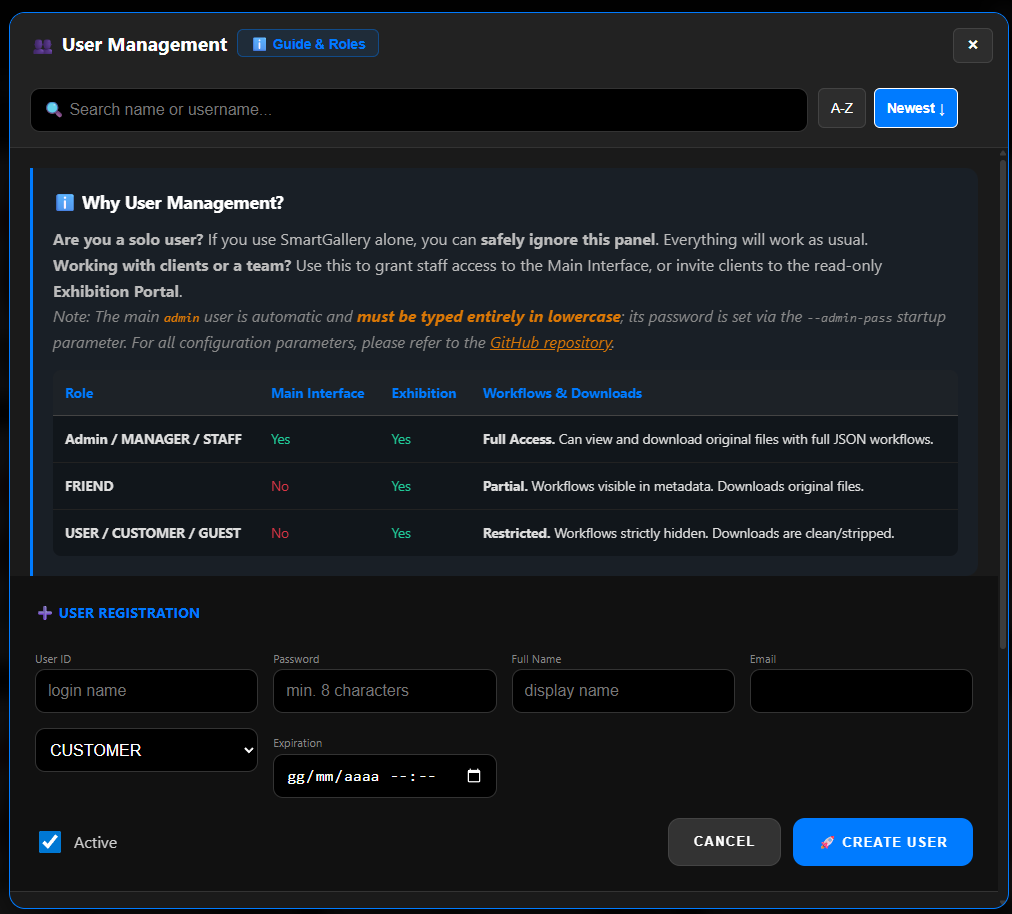
User Management
User Management panel: role permissions table, login analytics, and user creation form.
User Analytics: Tracks the last login timestamp for every user. Sort the user list by activity to see exactly when clients have engaged with the portal.
Create user accounts and assign roles on the fly.
Generate invite links for clients, no email server required.
Reset passwords and change roles at any time.
Moderate comments: Admin and MANAGER can see and delete all messages across both interfaces.
User management is activated automatically when running with --exhibition or --admin-pass + --force-login. In default single-user mode on a local network with no flags set, authentication is not required and you operate as system admin.
8. Complete Keyboard Shortcuts
SmartGallery is designed for a fully keyboard-driven workflow. Shortcuts are split between the Main Interface and the Exhibition Portal.
🌍 Global Controls (Main Interface)
These work anywhere in the application as long as you are not typing in a text field.